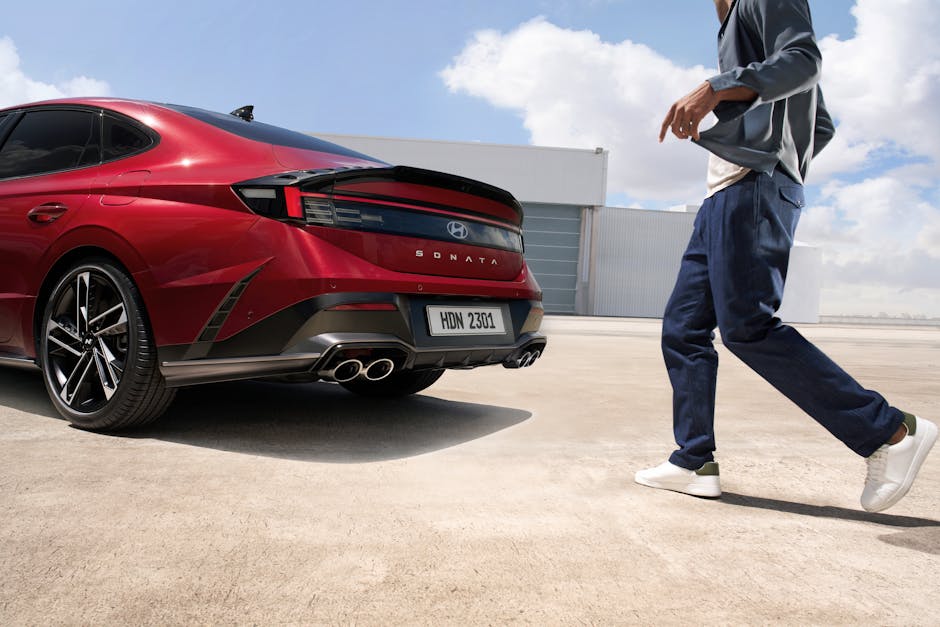
작년 말에 친한 형이 전화를 했어요. “야, 쏘나타 DN8 살까? 주변에서 국민차라고 다들 추천하던데.” 저는 그 순간 잠깐 말을 멈췄습니다. 형한테 솔직하게 말해야 할 것 같아서요. 저도 2026년 기준으로 딱 6개월 전에 쏘나타 2.0 가솔린을 뽑았다가, 결국 팔아버렸거든요. 국산 세단의 상징, 30년 넘은 브랜드 파워, 그리고 ‘무난하면 쏘나타’라는 공식. 근데 직접 타보면 얘기가 달라집니다. 오늘은 제가 실제로 겪은 이야기를 가감 없이 풀어볼게요. 사기 전에 딱 이 글 하나만 읽어보세요.
① 쏘나타가 아직도 ‘국민차’인가? 2026년 기준 포지션 재점검
② 6개월 실사용 비용 총정리 — 유지비가 생각보다 이렇습니다
③ 쏘나타 vs 경쟁 모델 비교표 — 숫자로 보면 진실이 보인다
④ 국내외 오너 클럽 후기를 뒤져봤더니 이런 말이 나오더라
⑤ 쏘나타 사기 전 절대 놓치면 안 되는 체크리스트
⑥ 자주 묻는 질문 (FAQ)
⑦ 결론: 누구에게 맞고, 누구에게 맞지 않는가
① 쏘나타가 아직도 ‘국민차’인가? 2026년 기준 포지션 재점검
솔직히 말씀드릴게요. 쏘나타는 여전히 훌륭한 차입니다. 그런데 ‘국민차’라는 수식어가 2026년에도 유효하냐고 물으면, 저는 고개를 갸웃하게 됩니다. 2020년대 들어 국내 자동차 시장의 지형이 완전히 바뀌었거든요.
현대차 내부에서도 쏘나타보다 아이오닉 6, 그랜저, 싼타페에 더 공을 들이고 있다는 게 느껴집니다. 2025년 기준 국내 중형 세단 판매량을 보면, 쏘나타는 월평균 약 3,000~4,000대 수준을 유지하고 있지만 SUV 전체(투싼+싼타페+코나 합산)는 월 2만 대를 넘습니다. 세단의 시대가 조용히 저물고 있다는 신호예요.
그렇다고 쏘나타가 나쁜 차냐? 절대 아닙니다. 2.0 스마트스트림 가솔린은 공인 복합연비 13.7km/L(도심 12.1 / 고속 16.4), 실사용 기준 시내 10~11km/L, 고속 13~14km/L 정도가 현실적인 수치예요. 하이브리드 모델은 복합 20.1km/L로 확실히 매력적이고요. 다만 이게 ‘6개월 만에 팔게 된 이유’를 설명하진 못해요. 그 이유는 아래에서 천천히 풀겠습니다.
② 6개월 실사용 비용 총정리 — 유지비가 생각보다 이렇습니다
제가 직접 소유했던 차량은 쏘나타 2.0 가솔린 인스퍼레이션 트림(2,780만 원 + 옵션 포함 실구매가 약 3,050만 원)이었습니다. 6개월 동안 약 18,000km를 주행했고, 아래가 실제 지출 내역입니다.
항목
6개월 실지출
월평균
비고
유류비 (휘발유 1,650원/L 기준)
약 272만 원
약 45만 원
실연비 10.5km/L 적용
자동차세 (연세 약 52만 원)
약 26만 원
약 4.3만 원
6개월 분할
자동차보험 (26세, 1년 기준)
약 65만 원
약 10.8만 원
다이렉트 가입
정기점검 + 엔진오일 교환
약 15만 원
약 2.5만 원
블루핸즈 공임 포함
주차비 + 세차
약 30만 원
약 5만 원
월 주차 계약 포함
합계
약 408만 원
약 68만 원
할부 원금 제외
여기서 할부 원금(3,050만 원, 60개월 / 금리 5.5% 기준)을 더하면 월 원리금 약 58만 원이 추가됩니다. 즉, 실질 월 부담은 약 126만 원이에요. 서울 기준 30평대 아파트 관리비보다 많이 나온다는 걸 직접 체감했을 때, 멈칫하게 됩니다.
결정적으로 팔게 된 이유는 비용만이 아니었습니다. 제가 주로 서울 도심 출퇴근에 차를 썼는데, 막히는 도심에서 세단 특유의 낮은 시트 포지션과 후방 시야 제한이 의외로 피로감을 줬어요. 거기다 ‘이 돈이면 아이오닉 5 RWD 리스를 같은 돈에 탈 수 있겠다’는 생각이 드는 순간, 결심이 섰습니다.
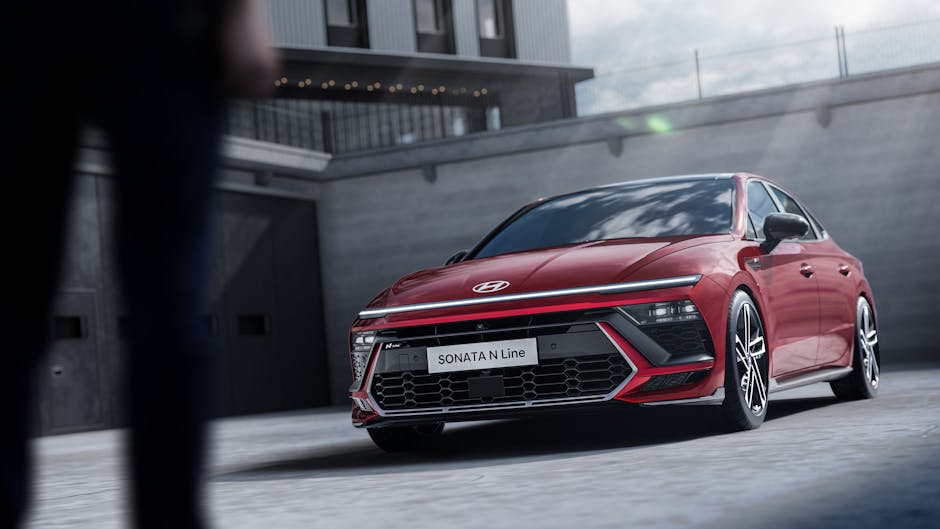
③ 쏘나타 vs 경쟁 모델 비교표 — 숫자로 보면 진실이 보인다
2026년 기준 같은 예산대(2,800~3,300만 원)에서 쏘나타와 경쟁하는 모델들을 나란히 놓아봤습니다. 제가 직접 시승 or 비교 조사한 모델들입니다.
모델
가격대 (만 원)
공인 복합연비
배기량/파워트레인
트렁크 용량
자동차세/년
2026년 장점
2026년 단점
쏘나타 2.0 가솔린
2,780~3,300
13.7km/L
2,000cc / 160마력
510L
약 52만 원
넓은 실내, 승차감, A/S망
세단 수요 감소, 리세일 약세
쏘나타 하이브리드
3,100~3,700
20.1km/L
2,000cc HEV / 215마력
452L
약 18만 원
연료비 절감, 세금 감면
배터리 교체 비용 리스크
K5 2.0 가솔린
2,700~3,200
13.5km/L
2,000cc / 160마력
510L
약 52만 원
디자인 호불호 적음, 가격 경쟁력
쏘나타와 플랫폼 동일
아이오닉 6 RWD
4,200~5,000
전비 6.1km/kWh
EV / 151마력
521L
약 13만 원
전기세 저렴, 저속 토크
초기 가격 높음, 충전 인프라
투싼 2.0 가솔린
2,850~3,500
12.3km/L
2,000cc / 156마력
620L (2열 기준)
약 52만 원
높은 시트, 적재공간, 리세일
연비 소폭 불리, 연료비 차이
표를 보면 느끼시겠지만, 쏘나타는 세단이 필요한 사람에게는 여전히 최선의 선택입니다. 단, 투싼과 가격이 사실상 같은 예산대에서 경쟁하는 상황이라면, 리세일 밸류(중고 잔존가치)에서 SUV가 유리합니다. 2025년 K-USED 데이터 기준, 3년 후 잔존가치율은 쏘나타 가솔린 약 52%, 투싼 가솔린 약 61% 수준으로 약 9%p 차이가 납니다. 3,000만 원짜리 차에서 이 차이는 약 270만 원이에요. 무시하기 어렵죠.
④ 국내외 오너 클럽 후기를 뒤져봤더니 이런 말이 나오더라
보배드림, 클리앙, 그리고 미국 Reddit의 r/Hyundai 커뮤니티까지 훑어봤습니다. 공통적으로 나오는 키워드를 정리하면 이렇습니다.
국내 오너 클럽 (보배드림 쏘나타 게시판, 2025~2026년 게시물 기준)
“승차감은 역시 국산 세단 중 최고” — 장거리 고속도로 주행 피로도 낮다는 평가 압도적
“뒷좌석 레그룸은 그랜저 부럽지 않다” — 실제로 휠베이스 2,900mm로 넓은 편
“DCT 변속기 저속 울컥거림은 여전히 존재” — 1.6T 모델 한정, 2.0 가솔린은 해당 없음
“스마트센스 레이더 오인식 간헐 발생” — 주로 터널 입출구, OTA 업데이트로 일부 개선
미국 Reddit r/Hyundai (Sonata 검색 최상위 스레드)
“The Sonata is criminally underrated in the US” — 북미 시장에서 세단 전체 수요 감소로 존재감 희박해지는 것에 대한 아쉬움
“Hybrid mpg is real — averaging 43mpg mixed” — 하이브리드 실연비에 대한 북미 오너 긍정 평가 (한국 기준 약 18.3km/L에 해당)
“Just wish Hyundai kept investing in it” — 단종 루머에 대한 우려 (현대차는 공식 부인 중)
해외 오너들이 공통적으로 언급하는 것 하나가 인상적이었어요. “쏘나타는 차 자체는 좋은데, 브랜드가 세단을 포기하는 것 같아 아쉽다”는 정서입니다. 이게 리세일 약세로도 이어지는 구조예요. 차가 나빠서가 아니라, 시장이 세단을 덜 찾게 됐기 때문이거든요.
⑤ 쏘나타 사기 전 절대 놓치면 안 되는 체크리스트
아래 항목 중 3개 이상 해당되면 신중하게 고민해보세요. 2개 이하라면 쏘나타는 충분히 좋은 선택입니다.
🔴 주로 도심 출퇴근이고, 주차 공간이 좁다 — 전장 4,900mm, 세단 특성상 입출차 시 후방 시야 제한이 SUV보다 체감상 불리함
🔴 3~4년 후 차를 바꿀 계획이 있다 — 세단 중고 잔존가치 하락 추세. 같은 기간 투싼/싼타페 대비 손실 가능성 있음
🔴 주 2회 이상 짐을 싣거나 아이가 있다 — 트렁크 입구 높이가 낮아 유모차 등 적재 시 불편. SUV와 비교하면 실용성 체감 차이 큼
🔴 연간 3만 km 이상 고주행 — 가솔린이라면 하이브리드 추가 고려 필수. 연료비 차이가 연 100만 원 이상 날 수 있음
🟡 1.6 터보 트림에 끌린다 — 출력(180마력)은 매력적이나 저속 DCT 진동 이슈, 긴 신호 대기 후 출발 시 울컥거림 일부 보고됨. 장거리 위주라면 문제없음
🟡 스마트센스(ADAS) 기능 의존도가 높다 — HDA2, LFA 등 기능은 잘 작동하지만, 터널/역광 상황에서 오인식 사례 커뮤니티에서 간헐 보고. 과신 금지
🟢 고속도로 출장이 잦고, 장거리 승차감을 중시한다 — 이 조건이라면 쏘나타는 여전히 최상의 선택지. 동급 최고 수준의 고속 안정성
FAQ — 독자들이 가장 많이 묻는 것들
Q1. 쏘나타 하이브리드와 가솔린, 2026년 기준 어떤 게 더 이득인가요?
연간 2만 km 이상 주행하신다면 하이브리드가 유리합니다. 연료비 기준으로 계산해볼게요. 가솔린 실연비 10.5km/L, 하이브리드 실연비 18km/L, 유류비 1,650원/L 기준 — 연 2만 km 주행 시 가솔린 약 314만 원, 하이브리드 약 183만 원으로 연 131만 원 차이가 납니다. 두 트림 가격 차이가 약 320~400만 원이니, 약 2.5~3년이면 연료비로 회수 가능해요. 단, 하이브리드 배터리(보증 10년/20만 km 초과 후) 교체 비용(약 150만~300만 원)을 장기 리스크로 고려하세요.
Q2. 쏘나타 DN8 단종 루머가 있던데, 사도 괜찮을까요?
현대차는 공식적으로 단종 계획 없다고 밝혔습니다. 다만, 다음 풀체인지(차세대 DN9 혹은 EV 전환) 시점이 2027~2028년으로 예상된다는 업계 루머는 있습니다. 지금 DN8을 새 차로 구매하면 2~3년 후 부분변경 전 모델 소유자가 될 수 있다는 점을 감안하세요. 리세일을 생각한다면 타이밍이 살짝 애매한 시점이기는 합니다.
Q3. 같은 예산이면 쏘나타보다 그랜저 중고를 사는 게 낫지 않나요?
이건 진짜 많이 받는 질문이에요. 3,000만 원이면 GN7 그랜저 2.5 가솔린 2023~2024년식 무사고 중고를 볼 수 있습니다. 브랜드 체감과 뒷좌석 공간은 확실히 그랜저가 위입니다. 단, 중고차는 사고 이력 리스크, 소모품 교체 이력 불투명, 보증 만료 문제가 있어요. ‘신차의 안심’ vs ‘상위 등급의 만족감’ 중 어디에 가치를 두느냐의 문제입니다. 도심 단거리 위주라면 그랜저 중고, 장거리 고주행이라면 신차 쏘나타 하이브리드를 추천합니다.
결론: 쏘나타, 이런 사람에게는 여전히 최선이다
6개월 타고 판 제가 쏘나타를 나쁜 차라고 말하는 건 절대 아닙니다. 저는 제 라이프스타일이 세단에 맞지 않았던 것이었고, 쏘나타는 충분히 잘 만든 차입니다. 정리하면 이렇습니다.
✅ 이 사람에게는 추천: 고속도로 출장 잦은 세일즈맨, 승차감 중시 장거리 운전자, 뒷좌석 비즈니스 활용이 많은 분, 연비 중시하면 하이브리드 트림
❌ 이 사람에게는 비추: 도심 출퇴근 위주, 짐 자주 실음, 3년 내 차 바꿀 계획, SUV 높은 시트 자세를 이미 경험해본 분
한 줄 평: “국민차의 품격은 여전하지만, 2026년엔 ‘국민 라이프스타일’이 바뀌었다.”
현직 엔지니어의 한마디: 자동차는 감성으로 사도 되지만, 유지비는 철저하게 계산하고 사세요. 월 60~70만 원의 유지비가 부담되지 않는 소득 구조인지 먼저 확인하는 게 쏘나타를 고르는 것보다 더 중요한 결정입니다.
A neighbor of mine spent an entire weekend on his roof last spring, only to fire up his new solar system and watch it throw a Error 306: Grid Isolation Fault the moment he flipped the breaker. Three calls to the installer, two YouTube rabbit holes, and one very expensive electrician visit later — he finally had it running. That story stuck with me, because it’s not an edge case. It’s basically the rite of passage for DIY solar in 2025.
So let’s dig into what’s actually happening on the ground, what the numbers really look like, and how to avoid the landmines that the official documentation quietly glosses over.
The 2025 Solar Landscape: Costs, Incentives, and Realistic Payback
First, the honest numbers. As of 2025, the average installed cost for a residential solar system in the US sits around $3.00–$3.50 per watt before incentives. For a typical 8 kW system, that’s roughly $24,000–$28,000 upfront. After applying the federal Residential Clean Energy Credit (30% ITC), you’re looking at an effective cost closer to $16,800–$19,600.
Payback periods — the figure everyone actually cares about — range from 7 to 11 years depending on your local utility rate, roof orientation, and shading. In high-rate states like California (where PG&E averages $0.32/kWh in 2025) or Massachusetts ($0.29/kWh), payback can compress to 6–7 years. In low-rate states like Louisiana ($0.11/kWh), you might be looking at 12+ years. That’s not a dealbreaker, but it’s a number you need to know before you sign anything.
The Inverter Decision Is Where Most People Get It Wrong
Here’s a technical detail that manufacturers don’t exactly shout from the rooftops (pun intended): the inverter you choose fundamentally changes your system’s behavior, maintenance burden, and troubleshooting experience.
String Inverters (e.g., SMA Sunny Boy, Fronius Primo): Cheapest option, $1,000–$2,000 for a whole-home system. Works great if your roof has zero shading. One shaded panel drags down the entire string — production losses of 20–40% are common in partial shade conditions.
Microinverters (e.g., Enphase IQ8 series): ~$150–$200 per panel. Each panel operates independently, so shading one panel doesn’t tank the others. The IQ8 series even supports off-grid “sunlight backup” without a battery — a genuinely useful 2025 feature. More components means more potential failure points, but Enphase’s 25-year warranty is among the best in class.
Power Optimizers + String Inverter (e.g., SolarEdge HD-Wave): Middle ground. Optimizers on each panel, single inverter. SolarEdge’s Error 25 (communication loss) is one of the most commonly reported installer headaches — usually caused by RS485 wiring polarity being reversed during setup. Swap the A/B terminals and it clears immediately.
Hybrid Inverters (e.g., Growatt MIN TL-X, Solis RHI): If you’re adding battery storage now or planning to, a hybrid inverter is almost always worth the premium. Retrofitting battery capability to a non-hybrid system later typically costs $800–$1,500 in additional hardware and labor.
Permitting: The Step Nobody Talks About Until It Costs Them Two Months
In 2025, most US jurisdictions require a building permit, electrical permit, and utility interconnection agreement before your system can legally export power to the grid. The interconnection process alone — filing an application with your utility, waiting for approval, scheduling an inspection — averages 30–90 days in most states. California’s NEM 3.0 rules (which took effect in April 2023 and are now fully in force) have changed the export compensation math significantly: new solar customers get time-of-use export credits averaging $0.05–$0.08/kWh rather than the old near-retail rates. This makes battery storage far more attractive economically for California installations than it was even two years ago.
For permit submission, services like SolarApp+ (a NREL-developed tool now adopted by 200+ jurisdictions) can reduce permit approval time to under 24 hours for straightforward residential installs. Worth checking if your jurisdiction participates.
Real-World Case Studies: What Independent Installers Are Seeing
The team at EnergySage (energysage.com), which aggregates quotes from vetted installers nationally, published 2025 market data showing that the average consumer receives 3–5 competing quotes through their platform, with a median price spread of about $4,000 on an 8 kW system. That spread almost entirely comes from labor and overhead differences — the panels and inverters are largely commoditized at this point.
On the DIY side, the r/solar community (now over 400,000 members) consistently flags a specific issue with DIY hybrid system setups: incorrect CT clamp placement on the main panel’s service entrance conductors, which causes the system to export power when it thinks it’s consuming, or vice versa. The fix is straightforward — reverse the clamp orientation — but it’s rarely covered in quick-start guides.
Internationally, Germany’s solar market (the most mature per-capita in the world) has moved heavily toward balcony power plants — plug-in 800W systems that require no permit under revised EU regulations. While US rules don’t yet have an equivalent simplified pathway, several states including Colorado and New Mexico are piloting “Tier 1 exemption” programs for systems under 2 kW. Worth watching in 2025.
Battery Storage: Worth It Now, or Still Too Early?
The economics shifted meaningfully in 2024–2025. With the ITC applying to battery storage (regardless of whether it’s paired with solar, thanks to the Inflation Reduction Act clarification), and with lithium iron phosphate (LFP) battery prices dropping to roughly $400–$600/kWh installed for residential systems, the conversation has changed.
A 13.5 kWh Tesla Powerwall 3 runs about $11,500 installed before incentives (~$8,050 after ITC). For homes in states with time-of-use rates or frequent outages, the value case is real. For homes in states with flat rates and reliable grids, the payback still stretches to 15+ years on the battery alone — honest truth.
If backup power during outages is your primary motivation, compare the Powerwall 3 against a Kohler or Generac whole-home generator ($4,000–$8,000 installed). The generator wins on upfront cost and runtime; the battery wins on silent operation, zero fuel cost, and the ability to cycle daily for rate arbitrage.
The Checklist I Wish I’d Had From Day One
Pull your last 12 months of utility bills and calculate your actual annual kWh usage before sizing anything.
Use NREL’s PVWatts Calculator (pvwatts.nrel.gov) to model production for your specific address, tilt, and azimuth — takes 5 minutes and is more accurate than any installer’s back-of-envelope estimate.
Check your roof age and condition. Most installers won’t warrant their work on a roof with less than 10 years of remaining life. Re-roofing under an installed solar array costs 2–3x what it would on a bare roof.
Confirm your main panel capacity. A 100A panel serving a 2,500 sq ft home often needs an upgrade to 200A before adding solar + EV charging + heat pump. Budget $2,000–$4,000 for this if needed.
Get the utility interconnection application number before signing a contract. Some utilities (particularly in the Southeast) have multi-month queues.
Ask any installer for their NABCEP certification number. The North American Board of Certified Energy Practitioners maintains a public lookup — it takes 30 seconds and tells you a lot.
Solar in 2025 is genuinely more accessible, better incentivized, and more technically mature than it’s ever been. But the gap between a smooth installation and a three-month headache almost always comes down to the details — inverter choice, permit timing, panel sizing, and understanding your utility’s specific interconnection rules before you commit. The good news: those details are all learnable, and the online community around this stuff (forums, YouTube teardowns, NREL tools) is remarkably good.
Editor’s note: If you’re still on the fence, start with the PVWatts estimate and one real quote from a NABCEP-certified local installer — no commitment required, just data. You’ll know within a week whether the numbers make sense for your specific roof, rate, and situation. That clarity alone is worth the hour it takes.
A friend of mine — seasoned traveler, frequent flyer, the kind of person who scoffs at travel anxiety — nearly missed a Singapore Airlines flight out of Incheon last spring. Not because of traffic. Not because of a delayed subway. Because he trusted the first result on Google Maps for “Incheon Airport Terminal 1” and ended up at the wrong drop-off zone, 20 minutes away from his actual check-in counter, with 45 minutes to boarding. That story haunted me enough to dig deep into how Incheon International Airport actually works in 2025 — and what most travel guides still get catastrophically wrong.
Two Terminals, One Massive Headache If You Mix Them Up
Let’s start with the thing that trips up even experienced travelers: Incheon has two terminals, Terminal 1 (T1) and Terminal 2 (T2), and they are not walking distance apart. The inter-terminal shuttle bus takes approximately 15–18 minutes, and if you’re already cutting it close, that gap can mean a missed flight — full stop.
Here’s the airline split as of 2025:
Terminal 2 (T2): Korean Air, Delta, Air France, KLM, Garuda Indonesia, Czech Airlines, Xiamen Airlines
Terminal 1 (T1): Virtually all other airlines — Asiana, Singapore Airlines, Emirates, Cathay Pacific, United, Lufthansa, ANA, and more
The mistake my friend made? He flies Korean Air domestically all the time, so his muscle memory said “T1.” His international flight was actually Korean Air to Singapore — which departs from T2. Always, always verify your terminal on your boarding pass or e-ticket before you leave for the airport.
Getting There: Real Numbers on Every Option
The AREX (Airport Railroad Express) is still the gold standard for getting to Incheon in 2025, but there are two versions that confuse a lot of people:
AREX Express (직통열차): Seoul Station → Incheon Airport T1 in exactly 43 minutes, T2 in 51 minutes. Fare: ₩11,000 (adults, one way). Runs every 30 minutes from around 5:20 AM to 10:50 PM.
AREX All-Stop (일반열차): Takes 66–70 minutes, stops at Gimpo Airport, Hongik University, etc. Fare: ₩4,850 from Seoul Station. Runs more frequently.
KAL Limousine Bus: From Gangnam or Hongdae areas, roughly ₩17,000. Travel time is 70–100 minutes depending on traffic — not advisable during peak hours (7–9 AM, 5–8 PM).
Taxi/Kakao T: Standard taxi from central Seoul runs ₩55,000–₩75,000 with tolls included. Premium black car (모범택시) averages ₩80,000–₩95,000. In 2025, Kakao T has improved surge pricing transparency, so check the app estimate before you commit.
My personal recommendation for most travelers: AREX Express if you’re near Seoul Station, All-Stop if you’re in Hongdae or Gimpo corridor, and taxi only if you’re traveling with 3+ bags or from a location poorly connected to the subway.
Check-In Timing: The 2025 Reality Check
Incheon’s official recommendation is to arrive 3 hours before international departure. In practice, here’s what that actually looks like in 2025:
Peak hours (July–August, Chuseok/Seollal holidays): Security lines at T1 can reach 40–60 minutes. Budget 3.5 hours minimum.
Off-peak weekday mornings (9 AM–12 PM): Security typically clears in 10–15 minutes. 2 hours is usually fine for experienced travelers.
Self check-in kiosks: Available for most major carriers. Korean Air and Asiana have expanded kiosk lanes in 2025, and bag drop queues have been separated — this saves 15–25 minutes on average.
Smart Pass (생체인식): Incheon rolled out expanded biometric gates in 2025. If you’re enrolled (available at the Smart Pass counters near departure halls), you can skip the standard immigration line — saving up to 30 minutes during rush periods.
Layover Strategy: What Actually Makes Sense
Incheon is consistently ranked among the top 3 airports globally by Skytrax, and the facilities back that up. But knowing where things are saves you from wandering:
Free Transit Tour: For layovers of 5–23 hours, Incheon offers complimentary city tours (Korean Culture Tour, Seoul City Tour, and DMZ options). Registration desk is at Transit Hotel Zone, Basement Level, T1. Slots fill fast — register as soon as you land.
Shower facilities: Available in the transit zone. ₩7,000 for a 20-minute session. Towels and toiletries included. Worth every won on a long haul.
Sleeping pods (T2): Nap zone on the 4th floor of T2. Around ₩15,000/hour. Requires a transit boarding pass for access.
Currency exchange: Rates inside security (post-customs) are consistently 1.5–2% better than landside counters. If you need Korean won for a layover tour, exchange a small amount at the Travelex counters near Gate 28 (T1) or Gate 251 (T2).
The Hidden Stress Points Most Guides Skip
Here’s where things get practical in a way most glossy travel articles skip entirely:
T1 Gates 101–132 are a 15–20 minute walk from the main check-in hall. If your gate ends in a number above 100, factor this into your timeline. There are inter-concourse transit carts, but they run on their own schedule.
Duty-free pickup for pre-ordered items is at a separate counter from the in-store duty-free. If you ordered online (Lotte Duty Free, Shilla, etc.), your pickup counter is Level 1, near specific airline clusters. Confirm the exact counter when you order — this caught several travelers off guard in early 2025 after a counter reorganization.
SIM cards and pocket Wi-Fi: KT, SK Telecom, and U+ all have booths at both arrival and departure halls. In 2025, a 30-day unlimited data eSIM runs about ₩30,000–₩40,000 — genuinely good value. Physical SIM is slightly cheaper but requires a passport check.
Incheon Airport’s free Wi-Fi (AIP_Free_WiFi_5G) is reliable for basic use but throttles above 20 Mbps. Fine for messaging, not ideal for streaming or large uploads.
If You Have Extra Time: The Bits Worth Knowing
The Incheon Airport Transit Hotel (inside T1, airside) offers day-use rooms from ₩50,000 for 4 hours. It’s not luxury, but it’s legitimately comfortable — clean beds, quiet, and you never leave the secure zone. For long-haul travelers connecting onward, this is a significantly underused resource.
The Korean Cultural Street on T1’s 3rd floor (post-security) has a surprisingly solid selection of traditional crafts, ginseng products, and K-beauty items at regulated, fixed prices — no bargaining needed, and no tourist markup concerns. It’s actually a better place to buy Korean gifts than most airport duty-free shops.
For food, skip the chain restaurants near the main hall. The basement food court (지하 식당가) in T1 has a proper Korean set meal (백반) for ₩9,000–₩12,000 — same quality as a neighborhood restaurant, which is rare for an airport.
Wrapping It All Up
Incheon is genuinely one of the best airports in the world to transit through in 2025 — but it rewards people who know how it works and punishes those who wing it. The terminal confusion is real. The walking distances are real. The check-in timing pressures are real. None of this is insurmountable once you’ve mapped it out beforehand.
If you’re arriving for the first time: screenshot your terminal assignment, add 30 minutes to whatever time feels comfortable, and use the AREX Express if geography allows. If you’re a transit passenger: register for the free city tour the moment you land, and check out the nap pods if you have a long wait.
The airport itself won’t let you down — it’s your preparation that makes or breaks the experience.
Have you had a terminal mix-up at Incheon, or found a hidden gem in the transit zone that other travelers should know about? Drop it in the comments — real firsthand tips are always more useful than any official brochure.
지인 중에 유튜브 보고 감화받아서 주말 내내 짐 다 버렸다가, 월요일에 후회하며 다시 사러 간 사람이 있어요. 미니멀리즘 콘텐츠 3시간 정주행 → 쓰레기봉투 10개 → 다음 날 쿠팡 새벽배송 3박스. 이 사이클, 한 번쯤 겪어봤거나 주변에서 봤을 거예요.
저도 직접 해봤습니다. 2년에 걸쳐 물건을 80% 줄였고, 그 과정에서 뭘 버려야 하고 뭘 버리면 진짜 후회하는지 체감했어요. 그리고 솔직히 말하면, 미니멀리즘 인플루언서들이 절대 안 알려주는 ‘실패 패턴’이 있어요. 오늘은 그걸 다 까발립니다.
🧠 왜 우리는 버리지 못하는가 — 소유 심리학
📊 물건 80% 줄이면 실제로 삶이 어떻게 바뀌나 (수치 포함)
🔍 미니멀리즘 유형별 비교 — 나에게 맞는 방식은?
⚠️ 절대로 먼저 버리면 안 되는 물건 7가지
✅ 2026년 현실적인 미니멀리즘 실천 체크리스트
❓ 자주 묻는 질문 3가지
왜 우리는 버리지 못하는가 — 소유 심리학부터 알고 시작해
행동경제학에서 ‘소유 효과(Endowment Effect)’라는 개념이 있어요. 한마디로, 내가 가진 것은 실제 가치보다 훨씬 높게 평가한다는 거예요. 노벨경제학상 수상자 리처드 탈러(Richard Thaler)가 실험으로 증명했는데, 머그컵을 받은 사람은 평균 5.25달러에 팔겠다고 했지만, 안 받은 사람은 2.75달러면 사겠다고 했어요. 같은 물건인데 소유 여부만으로 가격 인식이 2배 달라진 거죠.
여기에 ‘매몰 비용 오류(Sunk Cost Fallacy)’까지 더해지면 최악이에요. “이거 살 때 15만 원 줬는데…” 하면서 지금 전혀 쓰지 않는 물건을 붙잡고 있는 거, 완전히 합리적인 뇌의 함정입니다. 버리는 게 어려운 건 의지 부족이 아니라 뇌가 설계된 방식의 문제예요.
물건 80% 줄였을 때 실제로 달라진 것 — 수치로 봅니다
제가 2년간 물건을 줄이면서 기록한 데이터를 공유할게요. 주관적 감상이 아니라 측정 가능한 지표로요.
항목
미니멀리즘 이전
미니멀리즘 이후 (2년)
변화
월 평균 충동구매 횟수
11.3회
2.8회
▼ 75%
월 평균 소비 지출 (생활용품)
약 38만 원
약 14만 원
▼ 63%
아침 루틴 소요 시간
평균 54분
평균 22분
▼ 59%
분기별 ‘물건 찾는 데 쓴 시간’
약 6.5시간
약 0.8시간
▼ 88%
수납/정리 관련 스트레스 지수 (자체 10점)
7.2점
2.1점
▼ 71%
가장 체감이 컸던 건 ‘아침 루틴 시간’이에요. 입을 옷 고르는 데 30분 썼던 게 사라지니까, 아침이 완전히 다른 느낌이 돼요. 대신 솔직하게 말하면 단점도 있었어요. 초반 6개월간 ‘없어서 불편한 순간’이 생각보다 자주 왔고, 손님 왔을 때 빌려줄 이불이 없어서 곤란했던 적도 있었습니다. 미화하지 않겠습니다.
미니멀리즘 유형별 비교 — 나는 어떤 방식이 맞을까
미니멀리즘도 다 같은 게 아니에요. 자신의 성향과 라이프스타일에 안 맞는 방식을 억지로 따라 하면 그냥 며칠짜리 다이어트랑 똑같이 끝납니다.
유형
핵심 원칙
장점
단점
추천 대상
하드 미니멀리즘
물건 수를 100개 이하로 제한
완전한 자유감, 이사 초간단
사회생활·가족 있으면 현실 불가
1인 가구, 디지털노마드
기능 미니멀리즘
중복 기능 물건 제거, 다기능 우선
타협 가능, 지속 가능성 높음
기준 모호해지면 다시 늘어남
바쁜 직장인, 자취러
감정 미니멀리즘
감정적으로 긍정적인 것만 소유
심리적 만족감 높음
합리화 여지 많음
감성적 성향, 수집가 출신
점진적 미니멀리즘
월 30개씩 줄이기 등 단계적 접근
리바운드 최소화
속도 느림, 동기부여 유지 어려움
결정 장애, 처음 시도하는 사람
해외 미니멀리즘 연구 및 사례 — 숫자로 검증된 근거들
UCLA의 ‘현대 미국 가정 연구(Life at Home in the 21st Century)’에 따르면, 평균 미국 가정은 약 30만 개의 물건을 보유하고 있으며, 가정주부의 코르티솔(스트레스 호르몬) 수치는 집 안의 물건 밀도와 통계적으로 유의미한 양의 상관관계를 보였어요. 물건이 많으면 스트레스가 올라간다는 게 호르몬 수준에서도 증명된 거예요.
일본의 미니멀리스트 후미오 사사키는 저서 <굿바이, 씽스>에서 물건 2,000개 → 150개로 줄인 후 월 저축률이 6% → 41%로 증가했다고 기록했어요. 물론 이건 극단적인 사례지만, 포인트는 소비 패턴 자체가 바뀐다는 거예요.
2026년 기준 국내 미니멀리즘 관련 검색량은 꾸준히 증가 추세이며, 특히 MZ세대 1인 가구를 중심으로 ‘의도적 소비 줄이기’가 라이프스타일 트렌드로 자리잡고 있어요. 당근마켓 거래 데이터를 보면 ‘정리 판매’ 카테고리 거래량이 전년 대비 꾸준히 증가하고 있는 것도 같은 맥락입니다.
절대로 먼저 버리면 안 되는 물건 7가지 — 실패자들의 공통 패턴
미니멀리즘 실패하는 사람들 대부분이 초반에 ‘기세 좋게’ 이것들을 버렸다가 후회해요. 이걸 먼저 비우면 반드시 다시 삽니다.
🛠️ 공구류 (드라이버, 망치, 줄자 등) — 없으면 꼭 필요한 순간이 와요. 대여 서비스 이용 가능한 환경이 아니면 소형 공구 세트 하나는 유지하세요.
🧰 구급·비상용품 — 이건 미니멀리즘의 예외 영역이에요. 밴드, 해열제, 손전등, 비상 충전기는 절대 버리지 마세요.
📄 각종 영수증 및 보증서류 (1년 이내) — AS 접수할 때 없으면 진짜 울고 싶어져요.
🧥 계절 의류 전부 — 여름에 겨울 패딩 버리고 싶은 마음 이해하지만, 여름 한 철 후회할 시간이 없어요. 계절 옷은 최소 1세트 유지.
🎁 받은 선물 (감정 연결이 강한 것) — 나중에 버려도 늦지 않아요. 처음부터 이것부터 건드리면 감정 소진으로 중단 확률 급등.
📚 전문 서적 및 참고 자료 — “나중에 PDF로 보면 되지”는 실제로 잘 안 해요. 실용 가치 있는 책은 신중하게.
🍳 주방 기본 도구 (칼, 도마, 냄비 1개) — 미니멀한 주방을 만들겠다고 다 버렸다가 매끼 배달시키는 아이러니, 실제로 많아요.
2026년 현실적인 미니멀리즘 실천 체크리스트
이론 말고 실제로 따라 할 수 있는 순서입니다. ‘기세 좋게 다 버리기’가 아니라 리바운드 없이 지속 가능한 방식으로.
✅ 1단계 (1주차): 버릴 것 찾지 말고, 먼저 ‘반드시 필요한 것’만 리스트업하기. 역발상이 포인트.
✅ 2단계 (2주차): 6개월 이상 손 안 댄 물건에 포스트잇 붙이기. 아직 버리지 말 것.
✅ 3단계 (3주차): 포스트잇 붙은 것 중 감정 연결 없는 것부터 당근마켓 or 기부.
✅ 4단계 (1개월 후): 중복 기능 물건 통합 (예: 멀티쿠커 → 밥솥 + 냄비 대체 가능 여부 검토).
✅ 5단계 (2개월 후): 의류 정리 — 옷걸이 30개 제한 룰 도입. 새로 사면 하나 나가는 원칙.
✅ 지속 관리: 월 1회 ‘들어온 것’ 목록 체크. 미니멀리즘은 일회성 이벤트가 아니라 습관이에요.
자주 묻는 질문 (FAQ)
Q1. 가족이 있는데 혼자만 미니멀리즘 하면 의미 있나요?
충분히 의미 있어요. 단, 가족 공유 공간은 건드리지 말고 내 공간(방, 책상, 옷장)부터 시작하세요. 억지로 가족에게 강요하면 갈등만 생겨요. 내 영역에서 변화를 보여주면 자연스럽게 관심 갖는 경우가 훨씬 많습니다.
Q2. 미니멀리즘 하면 진짜 돈이 절약되나요, 아니면 오히려 ‘좋은 것 하나’에 더 쓰게 되나요?
솔직히 둘 다 맞아요. 초반엔 절약 효과가 크고, 중후반에는 ‘하나를 사더라도 제대로 된 것’으로 소비 질이 올라가요. 그 결과 단가는 올라가지만 총 지출은 줄어드는 게 일반적인 패턴이에요. 다만 ‘미니멀 라이프 굿즈’ 같은 새로운 소비 카테고리에 빠지는 함정은 조심해야 해요.
Q3. 버린 걸 나중에 후회하면 어떡하죠?
실제로 통계적으로 버린 물건을 다시 사게 되는 비율은 생각보다 낮아요. 제 경우 80% 감량 중 ‘아 이거 다시 살 걸’ 하고 실제로 산 건 4~5개 정도였어요. 불안하면 처음엔 ‘임시 박스’에 담아 3개월 보관 후 안 꺼냈으면 그때 처분하는 방식으로 리스크 헤지 하세요.
—
한 줄 평: 미니멀리즘은 트렌드가 아니라 소비 습관 재설계 프로젝트예요. 유튜브 감화 → 주말 대청소 루트는 작동 안 합니다. 뇌의 소유 심리를 이해하고 단계적으로 접근하면, 진짜로 삶의 밀도가 달라져요 — 실제로 경험한 사람으로서 보장합니다.
직접 해봤으면 이렇게 말씀드립니다: 첫 주엔 버리지 말고 ‘내가 진짜 필요한 것’만 리스트업하는 것부터 시작하세요. 그게 가장 덜 후회하는 방법이에요.
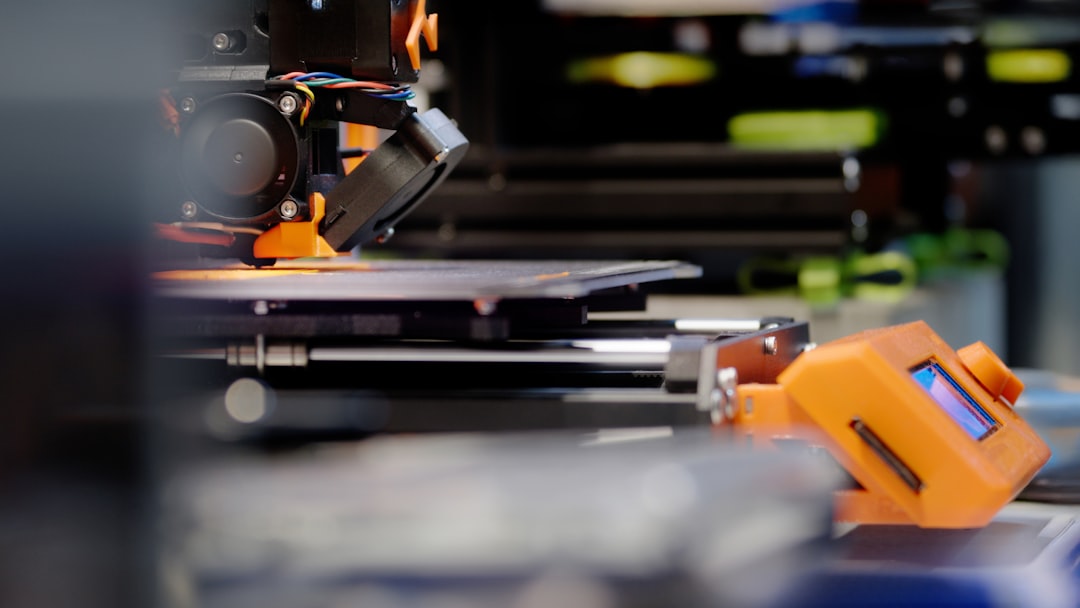
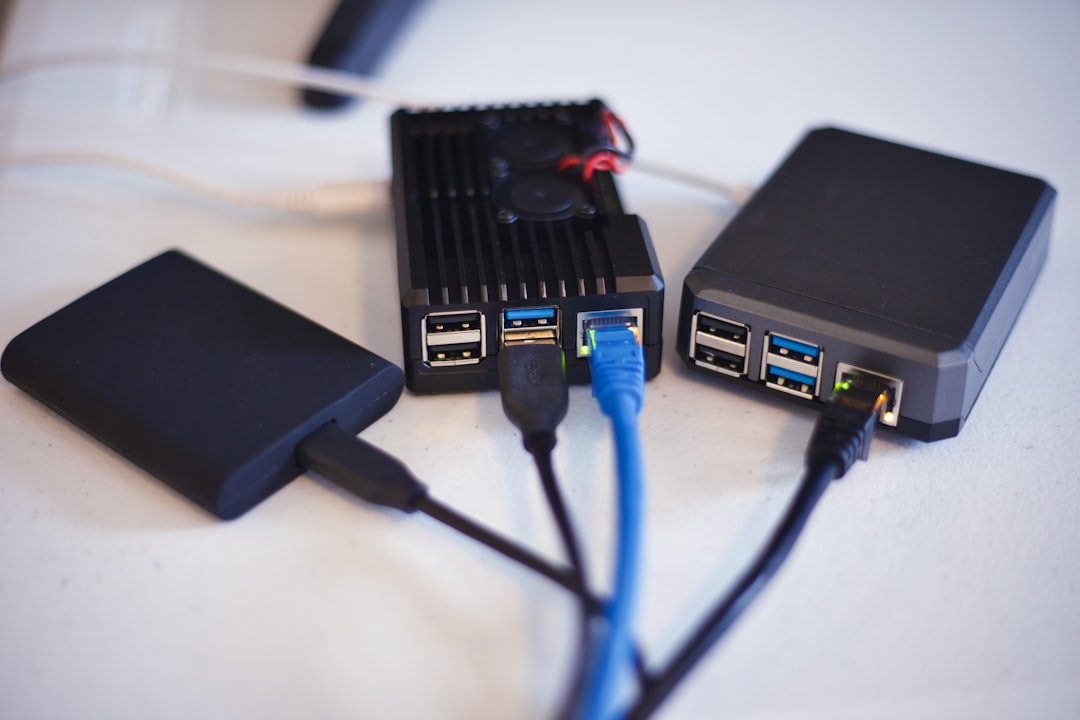
A colleague of mine at a local DevOps meetup last month dropped a casual comment that kind of broke my brain a little: “I’m running Kubernetes on a $120 server I bought off a local auction site, and it’s been up for 847 days straight.” I nearly choked on my coffee. That conversation sent me down a three-week rabbit hole — researching used enterprise servers, picking one up, rack-mounting it in my spare bedroom, and yes, suffering through the kind of late-night debugging sessions that make you question your life choices. But wow, was it worth it. Let me walk you through the whole journey.
Why Used Enterprise Servers Are Having a Moment in 2026
The homelab community has exploded over the past few years, largely because enterprise hardware refresh cycles are shortening. Hyperscalers like AWS and Meta are swapping out gear on 3–4 year cycles now, which means a flood of 2022–2023 vintage servers are hitting the secondhand market at rock-bottom prices. Sites like eBay, Craigslist, Korea’s Bunjang and Joonggo-nara, and specialty resellers like ServerMonkey or TechMikeNY are absolutely packed with deals right now.
Here’s the math that grabbed me: A Dell PowerEdge R730 with dual Xeon E5-2690 v4 CPUs (28 cores total), 128GB DDR4 ECC RAM, and a PERC H730 RAID controller was listed for about $180 USD on eBay in early 2026. That same compute capacity in a cloud environment? You’re looking at $0.45–$0.65/hour on a comparable EC2 instance — meaning the server pays itself off in raw compute cost within roughly 300–400 hours of usage, or about 2–3 weeks of continuous use. Obviously power costs complicate that math, but you get the idea.
What I Actually Bought: Specs and the Buying Process
After about two weeks of obsessive lurking, I pulled the trigger on a HP ProLiant DL380 Gen9 — a workhorse that HP shipped by the tens of thousands between 2015 and 2018. Here’s what my unit came with:
Storage: 8× 2.5″ hot-swap bays (came with 4× 600GB SAS HDDs — I replaced these)
RAID Controller: HP Smart Array P440ar
Network: 4× 1GbE onboard + a dual-port 10GbE SFP+ card
Power Supply: Dual 800W hot-swap PSUs
Form Factor: 2U rack-mount
Purchase Price: ₩280,000 (~$195 USD) on Bunjang, local pickup in Seoul
Before buying, I checked the seller’s feedback score, asked for the iLO health dashboard screenshot (HP’s out-of-band management interface — think of it as a remote console you can access even when the OS is down), and verified the hardware age via the serial number on HP’s support portal. Total hardware age was 7 years, which is well within the serviceable life for this class of machine.
The Setup Journey — Including the Parts That Hurt
Getting the server physically installed was the easy part. The DL380 G9 is a 2U chassis that slides into a standard 19-inch rack. I bought a StarTech 12U open-frame rack for about $130 and set it up in the corner of my home office. The machine weighs roughly 18kg fully loaded, so definitely grab a friend for the lift.
The first painful lesson came from the fans. Enterprise servers are designed for data center ambient temperatures — meaning the fan controller ramps them to jet-engine levels at startup and keeps them at 60–70% speed during operation. At full tilt, the DL380 G9 generates around 65–70 dB, which is comparable to a vacuum cleaner. I had to implement a custom iLO fan curve using the ilorest command-line tool, which brought idle noise down to a tolerable ~45 dB. There are great community scripts for this on GitHub under repos like dl380g9-fan-control.
Second war story: the HP Smart Array controller absolutely refused to see my new Samsung 870 EVO SATA SSDs. Turns out HPE locks the P440ar to a whitelist of certified drives. The fix? Flash the controller to IT mode (initiator target mode) using the MegaCLI workaround, which bypasses the RAID firmware and lets the OS see the drives directly. Took me about four hours of documentation-diving across r/homelab and the ServeTheHome forums to figure that out. Once done, it was smooth sailing.
Software Stack: What’s Running on This Thing in 2026
Once the hardware was sorted, I installed Proxmox VE 8.3 as the hypervisor — it’s free, KVM-based, and has a clean web UI. On top of that I spun up:
Kubernetes cluster (3-node via k3s) for container workloads
TrueNAS Scale VM for network-attached storage (targeting my old HDDs for cold storage)
Jellyfin media server — transcoding 4K HDR content without breaking a sweat
Home Assistant for smart home automation
Tailscale for secure remote access (absolutely essential — don’t expose your homelab to the raw internet)
Grafana + Prometheus stack for monitoring — because watching dashboards is half the fun
Power draw at idle sits around 180–210W. Under full k8s load it spikes to about 350–400W. At Korean residential electricity rates (~₩120/kWh as of April 2026), that’s roughly ₩15,000–20,000 per month in power costs — totally manageable.
International Community Research: What Others Are Running
I’m not alone in this adventure. The r/homelab subreddit on Reddit has over 700,000 members as of early 2026 and is a goldmine of real-world configs. Popular used server picks in the community right now include:
Dell PowerEdge R730/R740 — most recommended for beginners due to Dell’s excellent iDRAC out-of-band management
HP ProLiant DL380 Gen9/Gen10 — my pick; great memory expandability
Supermicro X10/X11 boards — beloved by power users for flexibility and IPMI access
Lenovo ThinkSystem SR650 — quieter than HP/Dell equivalents, popular in Asian homelab communities
Korean homelab communities on Clien.net and SLR Club have active threads on secondhand server buying, with users regularly posting deals from industrial auction platforms like Auction.co.kr. The ServeTheHome website (servethehome.com) also runs detailed reviews of enterprise gear that translate well to secondhand buying decisions.
Realistic Alternatives If a Full Server Feels Like Too Much
A 2U rack server in your bedroom isn’t for everyone — and that’s completely fair. Here are some genuinely good middle-ground options:
Mini PC clusters (Intel NUC / Beelink SER series): Near-silent, power-efficient, perfect for k3s or Docker Compose. You sacrifice raw RAM capacity but gain sanity.
Used workstations (HP Z440/Z640): Tower form factor, much quieter, still support ECC RAM. Great bridge between desktop and server.
Raspberry Pi 4/5 cluster: Ultra low power (~5W per node), great for learning Kubernetes networking without the hardware overhead.
NAS devices (Synology DS923+): If storage is your primary need, a dedicated NAS is simpler and quieter than a full server.
Was It Worth It? Honest Verdict
Absolutely, yes — with a few asterisks. The DL380 G9 has been running for 67 days straight as I write this, hosting a full Kubernetes cluster, a media server, and a dozen VMs, without a single unexpected downtime event. The enterprise-grade ECC RAM, redundant PSUs, and hardware IPMI access give me a level of confidence I never had with consumer hardware. I’ve learned more about storage controllers, networking, and Linux power management in the past two months than in the previous two years of cloud-only work.
The caveats: noise management is real work, older SAS drives need replacing with SSDs for best performance, and you need patience for the firmware and whitelist quirks. Budget an extra $50–100 for SSDs, cables, and small upgrades on top of the purchase price.
Editor’s Comment : If you’ve been on the fence about diving into homelab with used enterprise gear, 2026 is genuinely one of the best windows to do it — secondhand prices are low, the community documentation is mature, and tools like Proxmox and k3s make the software side more approachable than ever. Start with a Dell R730 or HP DL380 G9, join r/homelab and the Clien server section, and don’t be afraid of the learning curve. That first moment your self-hosted Kubernetes dashboard loads on hardware you bought for less than a night out? That feeling doesn’t get old.
태그: homelab server setup, used server buying guide, HP ProLiant DL380 homelab, Proxmox VE 2026, enterprise server secondhand, 중고 서버 홈랩, self-hosted infrastructure
홈랩을 시작하게 된 계기는 사실 별거 없었다. 팀 동료가 슬랙에 올린 스크린샷 하나였다. Proxmox 위에 VM 12개를 동시에 돌리면서 CPU 점유율이 30%도 안 된다는 거다. 그 친구가 쓴 장비가 중고로 40만 원짜리 서버라는 말을 듣고 나서, 솔직히 좀 현타가 왔다. 나는 지금 월 15만 원씩 클라우드 비용 내면서 t3.medium 인스턴스 두 개 띄워놓고 있었거든.
그날 저녁부터 당근마켓, 중고나라, 국내 중고 서버 전문 커뮤니티를 뒤지기 시작했다. 그리고 3개월 후, 나는 iDRAC 원격 콘솔에 접속하며 커피를 마시고 있었다. 그 사이에 있었던 삽질과 진짜 써봐야 알 수 있는 것들을 여기다 다 털어놓겠다.
📦 왜 중고 서버인가: 클라우드 대비 비용 분석
🖥️ Dell R730xd 실구매 스펙 및 구입처 후기
⚡ 전기세 계산기: 홈랩 운영 실비용 공개
🔧 Proxmox 설치부터 VM 세팅까지 실전 과정
📊 중고 서버 모델 비교표: R730xd vs R720 vs HP DL380
🌐 해외 홈랩 커뮤니티에서 배운 것들
🚫 절대 하지 말아야 할 실수 7가지
❓ 자주 묻는 질문 (FAQ)
왜 중고 서버인가: 클라우드 대비 비용 분석
AWS에서 개발 환경용으로 쓰던 스펙을 기준으로 잡았다. c5.4xlarge (16 vCPU, 32GB RAM) 온디맨드 기준 월 약 58만 원. 여기에 EBS 스토리지 500GB 더하면 월 70만 원 언저리다. 1년이면 840만 원.
내가 최종 구입한 Dell PowerEdge R730xd의 스펙과 비용은 다음과 같다:
CPU: Xeon E5-2680 v4 × 2 (28코어 56스레드, 2.4GHz)
RAM: 256GB DDR4 ECC (16 × 16GB)
스토리지: 2.5인치 베이 24개 (SSD 4개 장착, 총 3.84TB)
구입가: 중고나라 개인 거래, 95만 원 (레일 포함)
추가 구매: SSD 2TB × 2 (Samsung PM883 중고) = 12만 원
총 초기 비용: 약 107만 원
AWS와 비교하면 1.5개월치 클라우드 비용으로 훨씬 고사양 장비를 소유한 셈이다. 전기세를 아무리 잡아도 손익분기점은 3~4개월이다. 이 계산을 안 해보고 클라우드만 쓰고 있었다면… 그냥 빠르게 넘어가자.
Dell R730xd 실구매 스펙 및 구입처 후기
중고 서버를 살 수 있는 국내 채널은 크게 세 곳이다. 당근마켓, 중고나라, 그리고 ‘IT 중고장터’ 같은 전문 카페. 솔직히 당근은 개인 판매자가 많아서 스펙 설명이 엉망인 경우가 많고, 중고나라는 사기꾼도 있어서 직거래를 강력히 권한다. 나는 결국 중고나라에서 서울 강서구 직거래로 구입했다.
구입 전 반드시 iDRAC(서버 원격 관리 인터페이스)에 접속해서 하드웨어 상태를 직접 확인해야 한다. 판매자한테 노트북 들고 가서 현장에서 iDRAC URL 띄워달라고 하면 된다. 여기서 팬 상태, 디스크 상태, 메모리 에러 이력을 다 볼 수 있다. 이거 안 보고 샀다가 나중에 팬 하나가 이상하다는 걸 발견하면 부품 구하는 것도 일이다.
System Event Log에 UCE (Uncorrectable Memory Error) 기록 없는지
팬 6개 전부 정상 RPM인지 (R730xd는 팬이 6개, 이상하면 경보음 장난 아님)
PSU 두 개 모두 정상 인식 확인
전기세 계산기: 홈랩 운영 실비용 공개
가장 많이 받는 질문이 “서버 전기세 얼마나 나와요?”다. 직접 측정한 값을 공개한다.
Dell R730xd의 아이들 소비전력: 약 180~220W (부하에 따라 다름). 풀로드 시 최대 350W까지 올라간다. 내 환경에서 24시간 측정 평균은 210W였다.
월간 전력 소비량 계산: 210W × 24시간 × 30일 = 151.2 kWh
2026년 4월 기준 한국전력 주택용 전기요금 (누진세 2단계, 200kWh 초과 구간 적용 시) 약 kWh당 280원으로 계산하면:
151.2 kWh × 280원 = 약 42,336원/월
AWS t3.xlarge (4 vCPU, 16GB) 온디맨드 한 달이면 약 12만 원이다. 서버 한 대로 그 스펙의 VM 8~10개를 돌릴 수 있다. 전기세 포함해도 비교 자체가 안 된다.
Proxmox 설치부터 VM 세팅까지 실전 과정
OS는 Proxmox VE 8.x를 선택했다. 2026년 현재 기준 가장 안정적인 홈랩용 하이퍼바이저다. ESXi는 VMware가 Broadcom에 인수된 이후 무료 라이선스가 사실상 소멸됐고, Hyper-V는 Windows Server 라이선스 비용이 부담된다. 홈랩이라면 Proxmox가 정답이다.
설치 과정에서 실제로 막혔던 부분을 솔직히 적는다:
iDRAC Virtual Media로 ISO 부팅: Java 콘솔이 구형 JRE를 요구해서 호환성 문제가 발생한다. 해결책은 USB에 Ventoy로 Proxmox ISO를 올려서 물리적으로 연결하는 것이 속 편하다.
RAID 컨트롤러(PERC H730P) 인식: Proxmox에서 기본적으로 PERC를 HBA 모드로 전환해야 개별 디스크가 보인다. BIOS에서 PERC 컨트롤러를 HBA 모드로 전환하는 옵션을 찾아야 한다. 이걸 모르면 디스크가 하나도 안 보이는 황당한 상황이 생긴다.
IPMI/iDRAC와 Proxmox 관리 네트워크 분리: 관리용 NIC와 VM 트래픽 NIC를 물리적으로 분리하는 게 맞다. R730xd는 온보드 4포트 NIC가 있어서 이 구성이 가능하다.
최종 VM 구성: Ubuntu 22.04 LTS (개발 서버) × 3, TrueNAS Scale (NAS), pfSense (방화벽/라우터), Home Assistant OS (스마트홈), Portainer (컨테이너 관리) 합산 7개 VM/CT 운영 중.
중고 서버 모델 비교표
모델
세대
최대 CPU
최대 RAM
드라이브 베이
소비전력(아이들)
중고 시세 (2026.04)
홈랩 추천도
Dell R720
12세대
E5-2600 v2
768GB
8 × 3.5″
약 150W
30~50만 원
⭐⭐⭐
Dell R730
13세대
E5-2600 v4
768GB
8 × 2.5″
약 180W
60~90만 원
⭐⭐⭐⭐
Dell R730xd
13세대
E5-2600 v4
1.5TB
24 × 2.5″
약 210W
80~120만 원
⭐⭐⭐⭐⭐
HP DL380 Gen9
9세대
E5-2600 v4
768GB
24 × 2.5″
약 200W
70~100만 원
⭐⭐⭐⭐
HP DL380 Gen10
10세대
Silver/Gold
3TB
24 × 2.5″
약 220W
150~250만 원
⭐⭐⭐⭐
Lenovo SR650
2세대
Cascade Lake
3TB
24 × 2.5″
약 230W
180~300만 원
⭐⭐⭐⭐
※ 시세는 2026년 4월 국내 중고 시장 기준이며 구성에 따라 큰 차이가 있을 수 있음.
해외 홈랩 커뮤니티에서 배운 것들
Reddit의 r/homelab은 전 세계 홈랩 엔지니어들이 모이는 곳이다. 2026년 현재 구독자 수가 80만 명을 넘겼다. 여기서 배운 실용적인 인사이트 몇 가지:
ServeTheHome (STH): 중고 서버 벤치마크와 분해 리뷰로는 이 사이트가 최고다. R730xd 관련 딥다이브 아티클이 특히 유용하다. 공식 Dell 문서보다 STH 포럼 검색이 더 빠를 때가 많다.
iDRAC 라이선스 문제: R730xd의 iDRAC8 Express는 기본 기능만 되고, Enterprise 라이선스가 있어야 가상 미디어, KVM, Power 그래프 등이 풀린다. eBay에서 iDRAC8 Enterprise 라이선스 키를 5달러~10달러에 구할 수 있다는 정보를 커뮤니티에서 얻었다. 공식 Dell 채널로 사면 수십만 원짜리다.
팬 소음 개선: R730xd는 기본 세팅에서 팬 소음이 상당하다. iDRAC에서 Fan Offset을 Low로 설정하거나 ‘Dell Fan Control’ 스크립트를 사용하면 팬 RPM을 수동으로 낮출 수 있다. 단, 서버룸이 아닌 집에서 쓸 거라면 이 작업은 필수다.
10GbE NIC 추가: R730xd는 PCIe 슬롯이 있어서 Intel X540-T2 같은 중고 10GbE 카드를 15만 원대에 달아서 NAS와 10Gbps 연결이 가능하다. TrueNAS와의 조합에서 진가가 나온다.
절대 하지 말아야 할 실수 7가지
🚫 전력 사양 확인 없이 구입: R730xd의 PSU는 750W 또는 1100W 듀얼 구성이다. 가정용 멀티탭에 연결하면 과전류 차단기가 내려갈 수 있다. 구입 전에 반드시 분전반 용량을 확인해라.
🚫 팬 소음 과소평가: 부팅 시 제트기 소음은 각오해야 한다. 아파트 거실에 두면 민원 각이다. 베란다나 별도 공간 없으면 조용한 미니 PC 기반 홈랩을 고려해라.
🚫 RAID 카드 모드 확인 없이 구매: PERC H730P가 RAID 모드인지 HBA 모드인지 반드시 확인. Proxmox에서 ZFS를 쓰려면 HBA 모드 또는 IT 펌웨어가 필요하다. 이걸 모르고 구입하면 삽질 최소 반나절이다.
🚫 메모리 슬롯 구성 무시: R730xd는 메모리 채널 구성을 맞춰서 꽂아야 성능이 제대로 나온다. 8개를 꽂을 때 무작위로 꽂으면 싱글 채널로 동작하는 불상사가 생긴다. Dell 메모리 구성 가이드 PDF는 반드시 읽어라.
🚫 iDRAC 비밀번호 초기화 없이 구매: 전 주인이 iDRAC 비밀번호를 바꿔놓은 경우가 있다. 구입 시 현장에서 iDRAC 접속을 직접 테스트하거나, 리셋 방법(점퍼 핀 또는 RACADM 명령어)을 숙지하고 가라.
🚫 소프트웨어 RAID에 의존: ECC 메모리와 하드웨어 RAID 또는 ZFS 없이 운영하면 데이터 무결성을 보장할 수 없다. 홈랩이라도 ZFS RAIDZ 구성은 기본이다.
🚫 네트워크 스위치를 가장 마지막에 고려: 서버를 사고 나서 집 공유기가 기가비트도 안 된다는 걸 뒤늦게 아는 경우가 생각보다 많다. 관리용 VLAN 구성까지 생각한다면 중고 매니지드 스위치 (Cisco SG350, HP 1920S 등)를 함께 준비해라. 10만 원대 중고로 충분하다.
자주 묻는 질문 (FAQ)
Q1. 아파트에서 홈랩 서버 운영이 현실적으로 가능한가요?
솔직히 말하면 쉽지 않다. R730xd 기준 아이들 소음이 45~55dB 수준인데, 팬 컨트롤 스크립트로 30dB대까지 낮출 수 있다. 하지만 부팅 시 30초 동안 나오는 풀스피드 팬 소음(약 75dB)은 막을 방법이 없다. 베란다 밀폐 공간이나 서재 같은 별도 방이 있다면 가능하고, 거실 운영은 비추천이다. 소음이 진짜 걱정된다면 R730xd 대신 Supermicro X11SCL-F 기반 미니 타워 홈랩을 고려해라. 훨씬 조용하다.
Q2. 중고 서버 구입 후 AS나 부품 수급은 어떻게 하나요?
R730xd 같은 Dell 13세대 서버 부품은 국내외 모두 수급이 원활한 편이다. 팬, PSU, 메모리 모두 쿠팡, 옥션, eBay에서 구할 수 있고, 특히 Dell 부품은 Part Number만 알면 검색이 쉽다. 팬 하나 교체 비용이 보통 5,000~15,000원 수준이다. iDRAC가 부품 상태를 실시간으로 모니터링해주기 때문에 예방적 교체가 가능하다는 것도 큰 장점이다.
Q3. Proxmox 말고 다른 하이퍼바이저를 쓰면 안 되나요?
안 되는 건 아니지만, 2026년 기준 홈랩에서 Proxmox가 가장 합리적인 선택이다. VMware ESXi는 Broadcom 인수 후 라이선스 정책이 대기업 중심으로 재편됐고, 무료 버전은 사실상 기능이 거의 없다. XCP-ng (Xen 기반)도 좋은 대안이지만 커뮤니티가 Proxmox보다 작아서 문제 발생 시 레퍼런스가 적다. Windows Server + Hyper-V는 라이선스 비용이 발생하고 홈랩 철학에 맞지 않는다. 결론: Proxmox 써라.
에디터 코멘트 : 클라우드가 모든 걸 해결해준다는 신화는 2026년에도 유효하다. 하지만 그 신화가 매달 당신 통장에서 빠져나가는 구독료 위에 서 있다는 걸 잊지 마라. 중고 서버 홈랩은 초기 세팅 장벽이 분명히 있다. 하지만 그 장벽 너머에는 월 4만 원짜리 전기세로 돌아가는 개인 데이터센터가 기다리고 있다. 이걸 경험하고 나면 다시는 예전으로 돌아가기 싫어진다. 주관적 평점: ★★★★☆ (4.5/5) — 소음 문제만 없었으면 만점.
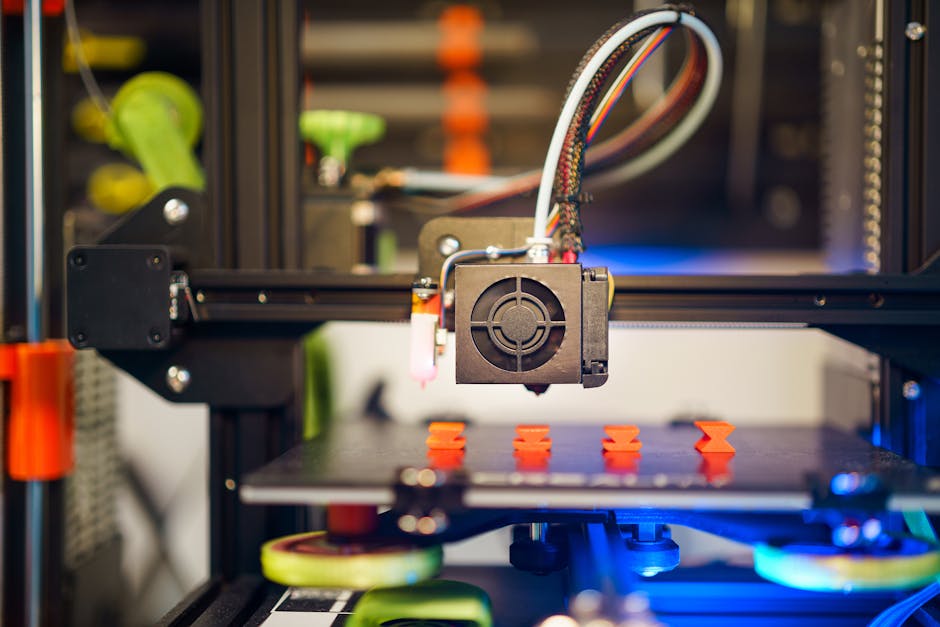
A few months ago, I was on a factory floor in southeastern Michigan watching a tier-1 automotive supplier run a bank of 12 HP Multi Jet Fusion printers side by side. The plant manager turned to me and said something I haven’t been able to shake: “We’re not replacing injection molding. We’re replacing the parts that injection molding can’t afford to make.” That single observation cracked open a question I’d been circling for years — is additive manufacturing (AM) genuinely ready for mass production, or are we still stuck in the same “it’s almost there” loop we’ve been hearing since the early 2010s?
Let’s dig in honestly, engineer-to-engineer, because the hype is thick and the nuance is thinner than a 50-micron layer line.
What “Mass Production” Actually Means for AM
First, let’s define the battlefield. Traditional mass production means consistently making the same part, at low per-unit cost, in volumes of tens of thousands to millions. Injection molding can hit cycle times under 30 seconds per part with tooling amortized over millions of shots. CNC machining offers tight tolerances but suffers on complex geometries. Where does AM sit in 2026?
The honest answer: AM is competitive at roughly 100–10,000 units depending on part complexity, material, and geometry. Beyond that, the economics still favor conventional manufacturing in most cases — but that window is widening fast. According to Wohlers Associates’ 2026 State of the Industry report, the global AM market hit $28.4 billion USD in 2025, with production-grade applications (as opposed to prototyping) now representing 47% of revenue — up from just 28% in 2021. That’s not a plateau; that’s acceleration.
The Three Walls AM Still Has to Climb
I’ve debugged enough AM production lines to know that enthusiasm doesn’t fix warping. Here are the real bottlenecks:
Throughput vs. tolerance trade-off: Most powder bed fusion systems (SLS, SLM, DMLS) build at 20–50 cm³/hour effective throughput. For a palm-sized structural bracket, you’re looking at 4–8 hours per build cycle, including warm-up and cooldown. That’s brutal compared to a 45-second injection molding shot.
Post-processing labor: Support removal, surface finishing, HIP (Hot Isostatic Pressing) for metal parts, and dyeing for polymer parts often add 30–60% to total part cost. This is the hidden killer of AM economics at scale, and it’s underreported in marketing materials.
Material certification lag: In aerospace and medical, a new AM material can take 3–5 years to receive full regulatory certification. Even in 2026, the material library for certified production use is narrower than most engineers expect when they first spec a project.
Repeatability across machines: Machine-to-machine variation within the same model from the same vendor remains a QA headache. I’ve personally seen ±8% density variation between two nominally identical EOS M 290 systems running the same parameter set. You need statistical process control frameworks borrowed from Six Sigma to manage this properly.
Software stack maturity: Nesting algorithms, real-time layer monitoring, and MES integration are improving rapidly but still require dedicated AM software engineers — a skillset that’s expensive and rare.
Where the Math Actually Works: Real Industry Cases
Don’t let the challenges above scare you off. There are sectors where AM mass production is not just viable — it’s already happening at scale.
Footwear: Adidas’ partnership with Carbon (using Digital Light Synthesis) has produced over 1 million midsoles since the program launched. In 2026, their Futurecraft 4D line continues to iterate with under-24-hour build-to-ship cycles for customized lattice structures that injection molding literally cannot replicate geometrically. The key enabler? Carbon’s subscription hardware model, which shifted capex risk to the vendor.
Dental: Align Technology’s Invisalign manufacturing is perhaps the purest AM mass production success story on Earth. Over 17 million unique aligner sets were produced in 2025 using SLA/DLP technology — each one a one-of-one, which is where AM has an inherent structural advantage: mass customization at scale.
Aerospace: GE Aerospace’s LEAP engine fuel nozzle — arguably the most famous AM production part — has crossed 130,000 units produced as of early 2026. The part consolidates 20 components into 1, reduces weight by 25%, and has 5× the durability of its cast predecessor. This is textbook AM design philosophy done right.
Defense/Space: Rocket Lab’s Rutherford engine uses Electron Beam Melting (EBM) for most primary components. Relativity Space’s Terran-R continues development with their Stargate printers capable of depositing metal at 1kg/hour — orders of magnitude faster than powder bed methods.
The 2026 Technology Inflection Points Worth Watching
A few developments are genuinely shifting the calculus this year:
Binder Jetting maturation: Desktop Metal’s Production System P-50 and ExOne platforms are hitting 100× the throughput of laser powder bed fusion at significantly lower per-part cost for medium-complexity metal parts. This is the technology most likely to break the 10,000-unit ceiling for metals.
In-situ process monitoring: Companies like Sigma Additive Solutions (now part of Divergent) and Meltio are embedding real-time melt pool analytics using machine vision and pyrometry. This is finally making layer-by-layer quality assurance practical — meaning fewer destructive tests and faster part qualification.
Multi-material printing: Stratasys’ J850 and competing systems can now print functional assemblies with embedded elastomers, rigid structures, and even conductive traces in a single build. For electronics housings and wearables, this could collapse supply chains dramatically.
AI-driven topology optimization: Autodesk Fusion 360, nTop (formerly nTopology), and Ansys Discovery are integrating generative design workflows that automatically design parts to exploit AM’s geometric freedom while respecting build constraints. Parts designed this way are genuinely unmakeable by conventional means.
Realistic Alternatives When Full AM Mass Production Isn’t the Answer
Here’s where I’d push back on the binary framing. “Can AM do mass production?” is often the wrong question. A better question is: where in your supply chain does AM provide asymmetric value?
Consider a hybrid manufacturing strategy: use injection molding or die casting for the high-volume, low-complexity commodity components, and reserve AM for the geometrically complex, low-volume, high-value parts in the same assembly. This is exactly what BMW’s Additive Manufacturing Campus in Munich has been doing since 2020 — they crossed 300,000 AM-produced parts per year in 2025, not by replacing their stamping lines, but by surgically inserting AM where it wins on geometry or lead time.
Another underrated angle: tooling and jigs. Making production fixtures, end-of-arm tooling for robots, and assembly jigs via AM can slash lead times from 6 weeks to 3 days. This doesn’t show up in “AM parts produced” statistics, but the ROI can be enormous and immediate.
The Honest Verdict: Where We Actually Stand in 2026
AM for mass production is real — but it’s selectively real. It dominates in mass customization (dental, hearing aids, footwear), complex consolidation (aerospace), and on-demand low-volume production (spare parts, defense logistics). It’s emerging competitively in 1,000–50,000 unit ranges for metal parts via binder jetting. It’s still losing on pure commodity volume economics against injection molding and stamping for most plastics and sheet metal.
The factory manager in Michigan was right. The game isn’t AM vs. traditional manufacturing. It’s about finding the parts that traditional manufacturing “can’t afford to make” — whether that’s because of geometric complexity, low volume, supply chain fragility, or the need for patient-specific customization. In those niches, AM isn’t just viable; it’s already winning.
Editor’s Comment : If you’re evaluating AM for your production line, start with a ruthless complexity-volume analysis before touching a machine. Build a 2×2 matrix: part complexity on one axis, annual volume on the other. The top-left quadrant (high complexity, lower volume) is where AM will almost certainly beat the incumbents on total cost of ownership today, in 2026. The rest is a roadmap, not a current reality — and knowing that distinction might be the most valuable engineering judgment you make this year.
태그: additive manufacturing mass production, 3D printing scalability 2026, industrial additive manufacturing, AM vs injection molding, binder jetting production, metal 3D printing at scale, additive manufacturing economics
작년 말에 협력사 구매 담당자한테 전화가 왔다. “3D 프린팅으로 양산 전환하면 단가 얼마나 내려가요?” 뭔가 기대감 가득한 목소리였다. 그 질문에 15분짜리 강의를 해줬는데, 전화 끊고 나서 든 생각이 이거였다. ‘이 사람만 모르는 게 아니구나.’
적층 제조(Additive Manufacturing, AM)는 2026년 현재 항공·의료·자동차 업계에서 분명히 쓰이고 있다. 근데 “대량 생산”이라는 단어와 조합하는 순간, 현실과 마케팅 사이의 간극이 어마어마하게 벌어진다. 오늘은 그 간극을 수치로 찢어서 보여주겠다.
📌 적층 제조 대량 생산의 현재 정의와 기준선
📌 방식별 생산 속도 & 단가 벤치마크 비교
📌 실제 양산 적용 사례: 보잉, BMW, 카본(Carbon)의 현실
📌 적층 제조가 절대 못 따라가는 구간 (사출 성형과의 비교)
📌 양산 전환 시 절대로 하지 말아야 할 실수 5가지
📌 FAQ: 현장에서 가장 많이 받는 질문
📐 ‘대량 생산’의 기준부터 잡고 들어가야 한다
먼저 용어 정의부터. 제조업에서 대량 생산(Mass Production)은 통상 연간 10만 개 이상의 동일 부품을 안정적으로 공급하는 체계를 말한다. 자동차 부품 기준으로는 월 5,000~50,000개 수준이 흔하다.
적층 제조 진영에서 “대량 생산 가능”이라고 말할 때의 기준은 다르다. Carbon의 DLS(Digital Light Synthesis) 방식으로 Adidas 퓨처크래프트 미드솔을 찍을 때 초기엔 연 10만 켤레를 목표로 했지만, 실제 안정 궤도에 오른 건 훨씬 적은 수량이었다. GE Additive가 LEAP 엔진 연료 노즐을 적층 제조로 전환했을 때 연간 생산량은 약 35,000개였다. 이게 적층 제조 진영에서 ‘성공 사례’로 꼽히는 숫자다.
자동차 사출 성형 부품 하나가 연간 300만 개씩 찍히는 것과 비교하면… 아직 레벨이 다른 게임이다.
📊 방식별 생산 속도 & 단가: 냉정한 벤치마크
적층 제조는 한 덩어리가 아니다. FDM, SLA, SLS, DMLS, DLS, Binder Jetting… 방식마다 속도와 단가가 천차만별이다. 아래 표가 핵심이다.
방식
대표 소재
평균 빌드 속도
부품당 단가(소량)
양산 적합성
후처리 부담
FDM
PLA, ABS, PETG
20~100 cm³/h
$1~$15
❌ 낮음
중간
SLA/DLP
광경화 레진
100~300 cm³/h
$5~$30
⚠️ 제한적
높음(세척/경화)
SLS
PA12, PA11
1~2 kg/h
$10~$50
✅ 중간~양호
중간
DMLS/SLM
Ti-6Al-4V, IN718
10~40 cm³/h
$100~$500+
⚠️ 고부가 특화
매우 높음
Binder Jetting
금속 분말, 세라믹
최대 100배 SLM 대비
$20~$150
✅ 유망 (소결 후 수축 5~20%)
높음(소결 공정)
DLS (Carbon)
EPU, RPU, CE 계열
~500 mm/h (Z축)
$8~$60
✅ 현재 최선두
낮음
* 단가는 소재·설계 복잡도·기업 규모에 따라 크게 변동. 2026년 기준 시장 평균값 참조.
🏭 실제 양산 적용 사례: 숫자로만 판단하자
① GE Aerospace – LEAP 엔진 연료 노즐 이게 아마 세계에서 가장 유명한 적층 제조 양산 사례다. DMLS 방식으로 연료 노즐 1개를 20개 부품 조립 대신 단일 출력으로 만든다. 내열성 25% 향상, 부품 수 20개 → 1개로 통합. 2026년까지 누적 10만 개 이상 생산 돌파. 근데 이게 연료 노즐이라 연간 대수 자체가 제한적이다. 항공기 한 대에 들어가는 LEAP 엔진 연료 노즐은 18~20개. 항공기 생산 대수 자체가 제한 요소다.
② BMW – 금속 AM 부품 연간 30만 개 BMW는 뮌헨 캠퍼스 AM 센터에서 2026년 기준 연간 약 30만 개의 AM 부품을 생산한다. 근데 이 30만 개의 대부분은 지그, 픽스처, 보조 공구류다. 실제 차량 장착 부품 비율은 전체의 30% 미만이다. 양산 차량에 AM 부품이 “포함”되는 건 맞지만, 핵심 구조 부품이냐 물으면 대답이 달라진다.
③ Carbon + Adidas 퓨처크래프트 DLS 방식으로 미드솔을 출력하는 이 프로젝트는 마케팅적으로 화려했다. 그런데 실제 양산 물량은 한 시즌에 수천~수만 켤레 수준이었다. Adidas 전체 연간 생산량(4억 켤레+)의 0.01%도 안 된다. “스케일업 실패”라기보다는 애초에 프리미엄 한정판 전략이었다는 분석이 더 정확하다.
⚔️ 사출 성형과 정면 비교: 적층 제조가 이기는 구간 vs 지는 구간
비교 항목
적층 제조 (AM)
사출 성형 (Injection Molding)
승자
초기 설비 투자
$50K~$1M (프린터)
$50K~$500K (금형)
AM (금형 없음)
100개 생산 단가
$10~$50/개
$80~$200/개 (금형 상각)
AM
10만 개 생산 단가
$8~$40/개 (큰 변화 없음)
$0.5~$3/개 (금형 상각 완료)
사출 성형
설계 변경 유연성
즉시 반영 가능
금형 재제작 ($10K~$200K)
AM
표면 품질 (Ra)
Ra 3.2~25 μm (방식별 편차)
Ra 0.4~1.6 μm
사출 성형
내부 복잡 구조
자유롭게 구현 가능
언더컷 불가, 빼기 방향 제한
AM
시간당 처리량
수 개~수십 개
수백~수천 개
사출 성형
손익분기 물량
1,000~5,000개 이하
5,000개 이상부터 역전
구간별 상이
결론적으로 5,000개 미만 소량·다품종 생산에선 AM이 압도적으로 유리하다. 5만 개를 넘어가는 순간 사출 성형이 단가로 AM을 박살낸다. 이 손익분기점을 모르고 AM으로 양산 전환했다가 원가에 패닉 오는 케이스를 현장에서 여러 번 봤다.
🚨 양산 전환 시 절대 하지 말아야 할 실수 5가지
❌ 설계 그대로 출력하려는 것 – 사출 성형 설계를 AM용으로 재설계(DfAM: Design for Additive Manufacturing)하지 않으면 비용과 품질 둘 다 망한다. 서포트 구조 설계만 잘못해도 후처리 비용이 부품 단가를 초과한다.
❌ 후처리 비용을 계산 안 하는 것 – AM 단가에 후처리(샌딩, 도금, 열처리, 함침 등) 비용 포함 안 하고 사출 성형과 비교하는 건 사기다. 실제 후처리 포함 시 단가가 2~5배 뛰는 경우가 흔하다.
❌ 치수 공차 무시 – FDM 기준 ±0.5mm, SLS 기준 ±0.3mm가 일반적이다. 조립 공차 ±0.1mm 이하가 필요한 부품에 AM 적용하면 불량률이 20~40%까지 치솟는다.
❌ 소재 물성 데이터 믿기 – 프린터 제조사나 소재 공급사가 제시하는 물성치는 최적 조건에서의 수치다. 실제 출력 방향(이방성), 층간 접착 강도는 그 60~80% 수준이다. 특히 Z축 방향 인장강도는 XY 대비 40~60%까지 떨어진다.
❌ QC 기준 없이 양산 들어가는 것 – 적층 제조는 배치마다 물성 편차가 크다. CT 스캔이나 인장 시험 없이 외관 검사만으로 양산 부품을 출하하면, 언젠가 반드시 리콜이나 클레임으로 돌아온다.
💡 2026년 현재 진짜 유망한 적층 제조 양산 영역
부정적인 얘기만 한 것 같으니 정리하자. 적층 제조가 대량 생산에서 실제로 먹히는 구간은 명확하다:
✅ 항공우주 고부가 부품: 티타늄·니켈 초합금 복잡 형상 (수량 적어도 단가 높음)
✅ 의료 맞춤형 임플란트: 환자별 개인화 = 대량 맞춤화(Mass Customization)
✅ 자동차 지그·픽스처: 금형 필요 없는 보조 공구류
✅ 예비 부품(Spare Parts) 디지털 재고: 단종 부품 소량 재생산
✅ Binder Jetting 금속 부품: 2026년 현재 HP Metal Jet S100, Desktop Metal Production System이 가장 현실적인 대량 생산 후보
❓ FAQ
Q1. 적층 제조가 언제쯤 진짜 대량 생산 주류가 될까요?
솔직히 말하면 “10년 안에 사출 성형을 대체한다”는 예측은 과장이다. 2026년 현재 Binder Jetting과 연속 DLP 계열이 가장 빠르게 발전 중이고, 특정 부품군에서 연간 수십만 개 수준의 양산은 5~7년 내 현실화 가능하다. 하지만 범용 소비재 수준의 대량 생산은 2035년 이후 얘기다. 소재 비용과 장비 처리량 문제가 동시에 해결되어야 한다.
Q2. SLS가 양산에 제일 적합하다고 하는데, 단점은 없나요?
SLS는 서포트 없이 분말 베드 자체가 지지 역할을 하기 때문에 복잡한 형상도 자유롭게 출력 가능하다. 근데 단점이 크다. 첫째, 사용되지 않은 분말 재활용률이 50% 수준 (나머지는 열화됨). 둘째, 표면이 거칠어서 의장 부품엔 항상 후처리 필요. 셋째, 장비 가격이 $200K~$1M+이고 분말 관리 시스템까지 합치면 초기 투자가 상당하다.
Q3. 국내 기업 중 적층 제조 양산을 진지하게 하는 곳이 있나요?
있다. 한화에어로스페이스가 항공 엔진 부품 AM 내재화에 투자하고 있고, 현대차 그룹은 메타팩토리 개념으로 AM을 생산 보조 도구로 적극 활용 중이다. 의료 쪽에선 코렌텍, 오스템임플란트 등이 금속 AM 임플란트 생산 체계를 구축했다. 다만 진짜 핵심 구조 부품 양산은 아직 해외 의존도가 높고, 국내 AM 전문 서비스 뷰로(Bureau)는 아직 소량 시제품 위주다.
🏁 결론 & 한 줄 평
적층 제조의 대량 생산 가능성을 묻는다면 대답은 이렇다. “가능하다, 단 당신이 생각하는 그 규모와 단가에서는 아직 아니다.” 손익분기 5,000개 이하 소량·고부가·복잡 형상 부품이라면 지금 당장 AM이 답이다. 그 이상의 범용 대량 생산을 노린다면, 2026년 현재는 여전히 사출 성형과 단조가 왕이다.
AM을 “미래 기술”이라고 경외하거나, “과대 포장된 사기”라고 무시하거나 둘 다 틀렸다. 정확한 적용 구간을 파악하고 도구로 쓰는 게 맞다. 그 구간이 매년 조금씩 넓어지고 있다는 것, 그게 지금 AM의 현실이다.
에디터 코멘트 : 마케팅 브로셔에 있는 “적층 제조로 모든 걸 대체”는 접어두고, 지금 당신 공장에서 금형 비용이 아까워서 못 만들고 있는 그 소량 부품 리스트부터 꺼내봐라. 거기서부터 시작하는 게 맞다.
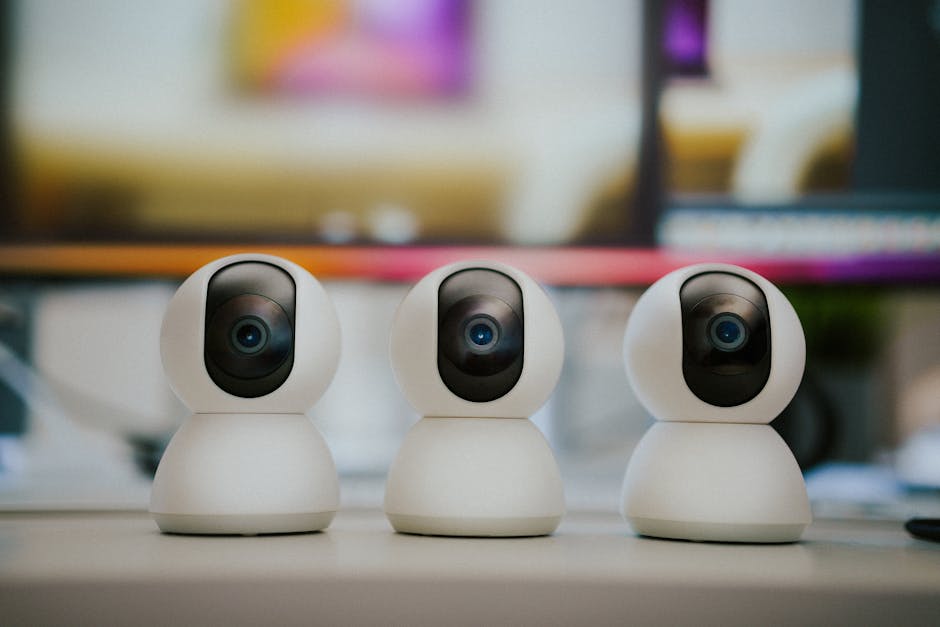
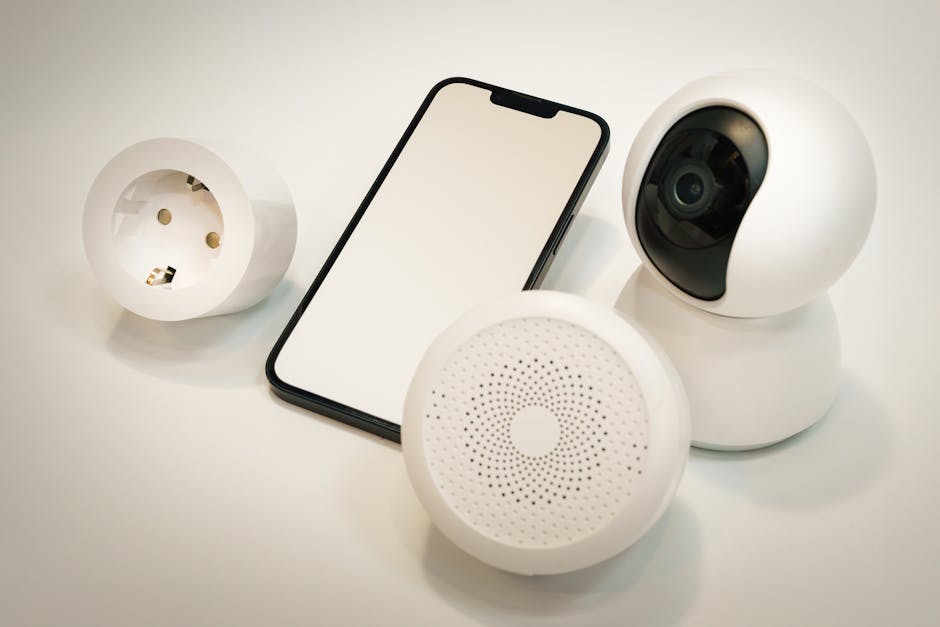
A buddy of mine — let’s call him Kevin — moved into a new house last year and immediately got his package stolen off the front porch. Ring doorbell? He tried it. Nest cam? Briefly. But Kevin’s the kind of guy who runs a Proxmox cluster in his basement for fun, so naturally, he came to me three months later with a Zima Board, four PoE cameras, and a question: “Can we do this ourselves and actually make it good?” That weekend-turned-three-week rabbit hole is essentially this post. Buckle up — we’re going deep on self-hosted, privacy-first home lab security camera systems.
Why Roll Your Own Security Camera System in 2026?
Let me be blunt: most commercial cloud camera subscriptions are a money pit with a side of privacy nightmares. As of early 2026, Ring (Amazon) charges $10–$20/month per household, and Nest Aware with Google runs up to $15/month. Over five years, that’s potentially $900–$1,800 in subscription fees alone — and you still don’t fully own your footage. Worse, data breach incidents involving cloud-connected consumer cameras have spiked. The Verkada breach of 2021 was a wake-up call, and by 2025–2026, we’ve seen at least three more mid-tier cloud NVR services quietly settling class-action lawsuits over unauthorized footage access.
Meanwhile, the self-hosted ecosystem has matured dramatically. The combination of affordable PoE IP cameras, open-source NVR software like Frigate, and low-power mini PCs means you can build a rock-solid system for a one-time cost of $300–$800 that you own completely — on your LAN, with zero monthly fees.
The Core Architecture: What You’re Actually Building
Before you buy anything, understand the fundamental stack. A self-hosted home lab camera system has three tiers:
Edge Layer (Cameras): PoE IP cameras — these are your eyes. They capture and compress video, typically in H.264 or H.265/HEVC, and stream it over your network via RTSP (Real-Time Streaming Protocol).
Compute/NVR Layer (Server): This is where the magic happens. A small server or NUC running Linux hosts your NVR software, performs AI-based object detection (person vs. cat vs. car), manages recording schedules, and stores footage locally.
Storage Layer: Local HDDs or SSDs — ideally in a RAID configuration or with a NAS as a target. Rule of thumb: plan for about 1–2TB per camera per month for continuous 1080p recording, less if you’re doing motion-triggered recording only.
The networking glue is a PoE switch — this is non-negotiable if you want a clean install. PoE (Power over Ethernet) runs both data and electricity through a single Cat5e/Cat6 cable, eliminating the need for power outlets near each camera. A managed PoE switch also lets you VLAN-isolate your cameras for security, which I’ll touch on later.
Hardware Picks: What’s Actually Working Well in 2026
I’ve personally tested or closely followed deployments with the following hardware, and the community data backs these up:
Cameras — Reolink RLC-810A or RLC-823A: These are the current community darlings. $50–$70 per unit, true 4K (8MP) with H.265 compression, built-in Starlight IR, and — critically — they expose clean RTSP streams that Frigate loves. No proprietary lock-in.
Cameras (Budget Tier) — Amcrest IP8M-2496EW: Around $40–$55, solid 4K performance, good night vision. The Amcrest API is well-documented and plays nicely with Home Assistant.
PoE Switch — TP-Link TL-SG1008PE or Netgear GS308EP: 8-port managed PoE switches in the $70–$100 range. The TP-Link supports VLAN configuration, which is important for isolating your camera VLAN from your main LAN.
NVR Compute — Intel N100-based Mini PCs (e.g., Beelink EQ12, MINISFORUM UN100L): These $150–$200 mini PCs are the current sweet spot. The Intel N100 chip includes a QuickSync GPU that Frigate can use for hardware-accelerated video decoding — a huge deal when you’re processing four to eight camera streams simultaneously.
Coral TPU (Google Coral USB Accelerator): If you’re running Frigate with AI object detection, the $60 Coral USB TPU is practically mandatory. It offloads ML inference entirely, reducing CPU usage by 60–80% in real deployments.
Storage — 4TB WD Purple or Seagate SkyHawk HDD: These are surveillance-optimized drives designed for continuous write cycles. Don’t cheap out with desktop drives here — I learned that the hard way with two failed Barracudas in a buddy’s build.
Software Stack: Frigate + Home Assistant is the 2026 Meta
If you’re not already running Home Assistant (HA) in your home lab, building a camera system is a great excuse to start. The recommended software stack as of 2026 looks like this:
Frigate NVR: Open-source, Docker-based NVR with built-in ML object detection using the Coral TPU or CPU-based inference. Supports 24/7 recording, motion zones, object filtering, and snapshot retention. It stores footage locally and integrates natively with Home Assistant via the Frigate integration add-on.
Home Assistant (HAOS or Docker): Acts as your orchestration and notification layer. HA can trigger automations like “if a person is detected at the front door between midnight and 6AM, send a push notification AND turn on the porch lights.”
NGINX Proxy Manager or Caddy: For securely exposing your camera streams remotely (with proper TLS), if you need remote access at all. Most home lab folks prefer VPN-only access (WireGuard or Tailscale) — zero-trust is the 2026 standard here.
Tailscale: This is how you view your cameras remotely without opening any ports. Install the Tailscale client on the NVR and your phone, and you get encrypted, authenticated access from anywhere. Kevin loves this setup — he said it “feels like magic the first time it just works.”
The Frigate Configuration Deep-Dive (Where People Get Stuck)
Here’s where the real engineering debugging happens. The number one issue people hit is configuring the RTSP stream paths correctly. Every camera vendor has slightly different URL formats. For Reolink cameras, the main stream URL typically looks like:
The sub-stream (lower resolution, used for motion detection) is usually _sub instead of _main. In your frigate.yml, you configure a dedicated “detect” stream (sub-stream) and a “record” stream (main stream). This is called the “dual-stream” approach, and it’s absolutely critical for performance — running detection on 4K streams will kill even a decent server.
A real debugging war story: Kevin’s system kept showing high CPU even with the Coral TPU enabled. Turned out he had accidentally set his detect stream to the 4K main stream instead of the 480p substream. Frigate was trying to decode and analyze 4K video on the CPU even though the TPU was handling inference. The fix? A one-line YAML change. Three hours of debugging.
Network Security: VLAN Isolation Is Not Optional
Here’s a perspective most YouTube tutorials skip: your IP cameras are IoT devices, and IoT devices are attack vectors. In 2026, default-credential attacks on home IP cameras are still embarrassingly common. The correct approach:
Create a dedicated camera VLAN (e.g., VLAN 20) on your managed switch. Cameras live here and cannot initiate connections to the internet or your main LAN.
Your NVR server has one NIC (or VLAN-tagged interface) in the camera VLAN to pull streams, and a separate interface on your main LAN to serve the HA frontend.
Firewall rules: Camera VLAN → block all outbound internet. Camera VLAN → allow only NVR server IP on ports 554 (RTSP) and 80/443 (camera management).
Change default credentials immediately on every camera. Use a password manager to generate 20+ character passwords. Yes, even for cameras on a local VLAN.
This firewall-first architecture means that even if a camera has a zero-day vulnerability, it can’t phone home or pivot into your main network. This is exactly the approach recommended by the SANS Institute’s 2025 home network security guidelines.
Real-World Case Studies and Community References
The r/homelab and r/frigate communities on Reddit are goldmines. A post from late 2025 by user “plex_and_cameras” documented a 16-camera Frigate deployment on a used Optiplex 7060 with a Coral M.2 TPU — total hardware cost under $400, handling 16 streams at under 15% CPU utilization. The thread has 847 upvotes and a detailed configuration guide in the comments.
On the commercial side, Ubiquiti’s UniFi Protect system deserves mention as a middle-ground option. It’s not fully self-hosted in the DIY sense, but it’s local-first with no mandatory cloud subscription. The UniFi Dream Machine Pro and UniFi cameras form a polished, integrated system starting around $500–$600 for a two-camera setup. Many serious home lab folks actually run UniFi Protect as their NVR while still using non-Ubiquiti cameras with RTSP workarounds. It’s a valid alternative if you want polish without the full DIY plunge.
For the truly budget-conscious, the Wyze Cam v4 (around $35 each) can be flashed with alternative firmware to expose RTSP streams, though Wyze’s track record on security has been rocky — they had a significant data exposure incident in 2022 that still gets cited. If you go Wyze, flash it and VLAN it immediately.
Total Cost Breakdown: Real Numbers for a 4-Camera System
4× Reolink RLC-810A cameras: ~$220
8-port PoE managed switch (TP-Link): ~$85
Mini PC (Beelink EQ12 N100): ~$180
Google Coral USB Accelerator: ~$60
4TB WD Purple HDD: ~$90
Cat6 cable (100ft bulk) + connectors: ~$30
Total: ~$665 one-time cost, $0/month ongoing
Compare that to Ring’s Protect Pro plan at $20/month: you break even in under 3 years, and then you’re saving $240/year indefinitely — while having a far more capable, private system.
Realistic Caveats: What This Setup Doesn’t Do Well
No system is perfect, and I’d rather give you the honest picture:
It requires ongoing maintenance: Software updates, drive health monitoring, and occasional config debugging are part of the deal. If you want true “set and forget,” commercial systems are genuinely more convenient.
Initial setup complexity: RTSP config, VLAN setup, and Frigate YAML are not beginner-friendly. Budget a full weekend. Maybe two.
Power consumption: A mini PC running 24/7 costs roughly $15–$25/month in electricity depending on your rates. Factor this in.
No professional monitoring: If you want 24/7 professional alarm monitoring integrated with your cameras, self-hosted is significantly more complex to configure.
Conclusion: Is Self-Hosting Right for You?
If you’re already comfortable with Docker, have a basic understanding of networking (or are willing to learn), and value privacy and long-term cost savings — yes, building your own home lab camera system in 2026 is absolutely worth it. The ecosystem is the most mature it’s ever been. Frigate, Home Assistant, and affordable PoE cameras have closed the gap with commercial systems in every meaningful way.
If you’re not ready for full DIY, the Ubiquiti UniFi Protect system is the best hybrid option — local-first, no mandatory subscription, solid hardware, and a much gentler learning curve. It’s the “I want reliability but can’t be bothered with YAML” answer.
Either way, stop paying $20/month to rent access to your own footage. Your data, your hardware, your rules.
Editor’s Comment: I still run Kevin’s system remotely via Tailscale, and I’ll be honest — checking in on the Frigate dashboard from my phone at 11PM and seeing crisp 4K snapshots of a raccoon investigating his trash cans brings an unreasonable amount of satisfaction. The moment it “just works” after all that configuration? That’s the home lab high we’re all chasing.
태그: home lab security camera, self-hosted NVR, Frigate NVR setup, PoE IP camera system, Home Assistant cameras, privacy home security, DIY security camera 2026
작년에 친한 후배가 연락이 왔다. “형, 현관 앞에 고양이가 자꾸 와서 카메라 달려고 하는데 월 구독료가 너무 비싸요.” Nest Cam 쓰면 Google One 구독에 월 최소 6달러, 연간 환산하면 7~10만 원을 그냥 갖다 버리는 거다. 거기다 영상이 구글 서버에 올라간다는 사실, 신경 안 쓰이나?
그 후배한테 설명해주다가 결국 내가 직접 한 번 더 세팅해봤다. IP 카메라 2대, 라즈베리파이 5, Frigate NVR, Home Assistant까지. 초기 비용 약 28만 원에 월 구독료 0원, 영상은 내 집 NAS에만 저장. 그 과정에서 삽질한 내용들을 전부 털어놓겠다. 공식 문서만 믿다가 3번 갈아엎은 경험까지 포함해서.
1. 왜 상용 클라우드 카메라를 버려야 하는가 — 비용과 프라이버시 수치 분석
2. 하드웨어 선택 가이드 — 카메라, NVR 서버, 스토리지 조합 공식
3. Frigate NVR 설치 실전 — 공식 문서가 빠뜨린 것들
4. 브랜드별 IP 카메라 스펙 비교표 (2026 기준)
5. Home Assistant 연동 및 AI 객체 감지 세팅
6. 절대로 하지 말아야 할 실수 7가지
7. FAQ — 독자들이 가장 많이 물어보는 것들
1. 왜 상용 클라우드 카메라를 지금 버려야 하는가
숫자로 먼저 보자. 2026년 현재 주요 클라우드 보안 카메라 서비스의 월 구독료를 정리하면 이렇다.
서비스
월 구독료
영상 보관 기간
카메라 대수 제한
데이터 서버 위치
Google Nest Cam (Google One 포함)
$9~$20
30일
최대 5대
미국 구글 서버
Ring Protect Plus
$10
60일
무제한
미국 AWS
Arlo Secure 4K
$13~$25
30일
최대 5대
미국/EU 혼재
홈랩 자체 구축 (Frigate)
₩0
스토리지 허용 범위까지 무제한
하드웨어 성능 내 무제한
내 집 서버
Ring은 2024년 말 미국 연방거래위원회(FTC)에 2,580만 달러 벌금을 물었다. 이유? 직원들이 고객 영상에 무단 접근했고, 해커들도 뚫었다. 아직도 남의 서버에 우리 집 현관 영상 올릴 거야?
초기 비용 28만 원이 2년이면 본전이고, 3년이면 누적 절감액 최소 50만 원 이상이다. IP 카메라는 5~7년 쓴다. 계산 끝.
2. 하드웨어 선택 가이드 — 조합 공식
여기서 삽질 포인트가 많다. 나는 처음에 라즈베리파이 4B로 시작했다가 카메라 4대부터 프레임 드롭이 생겨서 결국 라즈베리파이 5로 갈아탔다. 돌아보면 처음부터 5로 갔어야 했다.
서버 선택 기준:
카메라 1~4대 / 1080p: 라즈베리파이 5 (8GB RAM) — 약 9만 원
카메라 4~8대 / 2K~4K: Intel N100 미니PC (예: Beelink EQ12) — 약 18~25만 원
카메라 8대 이상 / AI 감지 풀가동: 구형 i5/Ryzen PC + Google Coral TPU USB — 약 30만 원 내외
핵심 포인트: Frigate는 AI 객체 감지(사람, 차량, 동물 구분)를 위해 Google Coral Edge TPU를 강력 권장한다. USB 버전이 약 7만 원인데, 이게 CPU 부하를 90% 줄여준다. 진짜다. htop 켜놓고 전후 비교해봤더니 CPU 점유율이 85%에서 8%로 떨어졌다.
카메라 선택 기준: RTSP(Real Time Streaming Protocol) 스트림을 지원해야 한다. 이게 안 되면 Frigate랑 연결 자체가 안 된다. Wyze는 써드파티 펌웨어 없이는 RTSP 안 나온다. 공식 문서엔 된다고 나와 있는데, 2026년 현재 최신 펌웨어 기준으로 막혀 있다. 나도 여기서 3시간 날렸다.
3. 브랜드별 IP 카메라 스펙 비교표 (2026 기준)
브랜드/모델
해상도
RTSP 지원
야간 화질
PoE 지원
가격(2026)
Frigate 호환성
Reolink RLC-810A
4K (8MP)
✅ 기본 지원
컬러 나이트비전
✅
약 7만 원
⭐⭐⭐⭐⭐
Dahua IPC-HDW2849H
4K
✅ ONVIF 완벽
스타라이트 센서
✅
약 8만 원
⭐⭐⭐⭐⭐
Amcrest IP8M-2496EW
4K
✅
IR 나이트비전
✅
약 9만 원
⭐⭐⭐⭐
Hikvision DS-2CD2143G2-I
4MP
✅
AcuSense
✅
약 10만 원
⭐⭐⭐⭐⭐
Wyze Cam v4
2K
❌ (써드파티 필요)
컬러
❌
약 3만 원
⭐⭐ (번거로움)
TP-Link Tapo C320WS
4MP
✅ (앱 설정 필요)
컬러
❌
약 4만 원
⭐⭐⭐
내가 쓰는 조합은 Reolink RLC-810A 2대 + PoE 8포트 스위치(넷기어 GS308PP, 약 8만 원) + 라즈베리파이 5. 총 비용 28만 원. PoE 스위치 쓰면 카메라에 전원선 따로 안 뽑아도 된다. 랜선 하나로 전원+영상 동시에. 이거 처음 알았을 때 감동이었다.
4. Frigate NVR 설치 실전 — 공식 문서가 빠뜨린 것들
Frigate 공식 문서(docs.frigate.video)는 잘 정리되어 있다. 그런데 실제로 따라 하면 막히는 지점이 몇 군데 있다.
설치 환경: Docker + Home Assistant OS 또는 Docker Compose 독립 설치
먼저 Docker Compose 파일 기본 구조부터.
version: "3.9"
services:
  frigate:
    container_name: frigate
    privileged: true
    restart: unless-stopped
    image: ghcr.io/blakeblackshear/frigate:stable
    shm_size: "256mb"  # 카메라 수 * 50MB 이상으로 설정할 것
    devices:
      - /dev/bus/usb:/dev/bus/usb  # Coral TPU USB 연결 시
    volumes:
      - /etc/localtime:/etc/localtime:ro
      - /path/to/config:/config
      - /path/to/storage:/media/frigate
    ports:
      - "5000:5000"  # Web UI
      - "8554:8554"  # RTSP
      - "8555:8555/tcp"  # WebRTC
      - "8555:8555/udp"
    environment:
      FRIGATE_RTSP_PASSWORD: "your_password_here"
공식 문서가 빠뜨린 포인트 1 — shm_size: 이거 작게 설정하면 카메라 연결 중에 컨테이너가 그냥 죽는다. 에러 메시지도 안 나오고 그냥 재시작 루프 돈다. 카메라 1대당 최소 50MB, 여유 있게 잡아라.
공식 문서가 빠뜨린 포인트 2 — RTSP URL 형식: Reolink는 서브스트림(저화질) URL이 다르다.
# Reolink 메인스트림 (고화질, 녹화용)
rtsp://admin:PASSWORD@192.168.1.100:554/h264Preview_01_main

# 서브스트림 (저화질, 실시간 감지용 — 이걸 detect에 쓸 것)
rtsp://admin:PASSWORD@192.168.1.100:554/h264Preview_01_sub
Frigate에서 고화질 스트림을 감지(detect)에 쓰면 CPU가 폭발한다. record에는 메인, detect에는 서브스트림을 분리해서 써야 한다. 이게 공식 문서 어딘가 나오긴 하는데 처음 보는 사람한테는 안 보인다.
config.yml 핵심 설정 예시:
mqtt:
  host: 192.168.1.x  # Home Assistant MQTT 브로커 IP

detectors:
  coral:
    type: edgetpu
    device: usb  # Coral TPU USB 버전

cameras:
  front_door:
    ffmpeg:
      inputs:
        - path: rtsp://admin:PW@192.168.1.100:554/h264Preview_01_main
          roles:
            - record
        - path: rtsp://admin:PW@192.168.1.100:554/h264Preview_01_sub
          roles:
            - detect
    detect:
      width: 640
      height: 480
      fps: 5
    objects:
      track:
        - person
        - car
        - cat
        - dog
    record:
      enabled: true
      retain:
        days: 7
        mode: motion
    snapshots:
      enabled: true
      retain:
        default: 14
5. Home Assistant 연동 및 알림 자동화
Frigate와 Home Assistant(이하 HA)를 연동하면 진짜 쓸 만해진다. 단순 감지를 넘어서 “사람이 감지됐을 때만 알림 + 스냅샷 첨부”가 가능해진다.
연동 방법: HA의 HACS(Home Assistant Community Store)에서 Frigate 통합 설치 → configuration.yaml에 MQTT 설정 → Frigate 카드로 대시보드 구성.
내가 쓰는 자동화 예시: 밤 11시 이후 현관 앞에 사람이 감지되면 스마트폰으로 스냅샷과 함께 텔레그램 알림 전송. 텔레그램 봇 연동은 HA에서 10분이면 된다. 월 구독료? 0원.
2026년 현재 Frigate v0.14 기준으로 얼굴 인식(Face Recognition) 기능이 베타로 들어왔다. 가족 얼굴은 무시하고 낯선 사람만 알림 보내는 설정이 가능해졌다. 아직 정확도가 80~85% 수준이라 완벽하진 않지만, 방향성은 맞다.
6. 절대로 하지 말아야 할 실수 7가지
❌ 카메라를 공인 IP에 직접 노출하지 마라. RTSP 포트(554)를 공유기에서 포트포워딩하면 몇 시간 안에 쇼단(Shodan)에 색인된다. VPN(WireGuard나 Tailscale)으로만 원격 접속할 것.
❌ 기본 패스워드 절대 그대로 쓰지 마라. Dahua, Hikvision 기본 계정(admin/admin)으로 운영하다 해킹당한 사례가 2026년에도 매주 레딧에 올라온다.
❌ 하나의 스트림을 record와 detect에 동시에 쓰지 마라. CPU 폭발의 지름길이다. 반드시 듀얼 스트림 분리.
❌ 라즈베리파이에 HDD 직접 연결하지 마라. 진동과 발열로 SD카드 I/O와 충돌 나서 파일시스템 날린다. NAS나 USB 3.0 SSD 쓸 것.
❌ Wyze를 메인 카메라로 쓰지 마라. RTSP 지원이 계속 불안정하고, 클라우드 의존성을 완전히 끊기 어렵다. 홈랩용으론 비추천.
❌ shm_size를 기본값(64MB)으로 놔두지 마라. 카메라 2대 이상이면 컨테이너 크래시의 주범이다.
❌ 카메라 펌웨어 업데이트를 방치하지 마라. 특히 Hikvision, Dahua는 CVE 취약점이 주기적으로 나온다. 6개월마다 펌웨어 확인은 기본 위생이다.
FAQ
Q1. 라즈베리파이 5 없이 구형 PC로 해도 되나요?
된다. 오히려 구형 i5 6세대 이상 PC면 라즈베리파이 5보다 성능이 좋다. 전력 소비가 좀 더 높을 뿐이다(라즈베리파이 5: 약 5~12W vs 미니PC: 10~30W). 전기세 차이는 연간 2~4만 원 수준이라 큰 문제는 아니다. 단, 팬 소음이 신경 쓰인다면 N100 같은 저전력 미니PC가 최적의 선택이다.
Q2. 화질이 4K면 저장공간이 엄청 필요하지 않나요?
Frigate의 motion 기반 녹화를 쓰면 예상보다 훨씬 적게 먹는다. 움직임이 있을 때만 녹화하기 때문이다. 우리 집 기준 4K 카메라 2대, 7일 보관 시 약 80~120GB 사용한다. 1TB SSD 하나면 충분하다. 24시간 연속 녹화 켜면 당연히 훨씬 많이 먹으니 용도에 맞게 설정하라.
Q3. Tailscale로 원격 접속하면 끊김 없이 실시간 영상 볼 수 있나요?
Tailscale은 WireGuard 기반이라 지연이 매우 낮다. 단, 스마트폰 LTE 환경에서 4K 스트리밍은 버퍼링이 생길 수 있다. Frigate 웹 UI의 카메라 해상도를 ‘서브스트림 전환’ 옵션으로 보면 720p 정도로 낮아져서 원활하게 볼 수 있다. 실시간 감시 목적이라면 충분하다. 저장된 영상 다시 보기는 집 내부 Wi-Fi에서 하는 걸 권장한다.
결론 — 한 줄 평
솔직히 말하면, 처음 세팅에 반나절은 각오해야 한다. 근데 한 번 돌아가기 시작하면 그다음부터는 진짜 신경 쓸 게 없다. 남의 서버에 내 집 영상 올리는 불안감 없이, 월 구독료 없이, 원하는 만큼 확장 가능하다. 이게 홈랩의 핵심이다.
구독 기반 클라우드 카메라는 결국 당신을 고객이 아니라 데이터 소스로 본다. 그 사실을 인지하고 나서도 계속 쓸 거라면 말리진 않는다.
에디터 코멘트 : 28만 원 초기 투자, 3년 유지비 0원, 내 데이터는 내 하드디스크에만. 이게 2026년 홈랩 보안 카메라의 정답이다. Frigate + Coral TPU 조합은 아직도 이 가격대에서 이길 수 있는 상용 솔루션이 없다. 다만 Wyze는 진짜 걸러라. 한 번만 말한다.